In this article, you learn how to associate a public IP address to an existing virtual machine (VM). To do so, you associate the public IP address to an IP configuration of a network interface attached to a VM. You can use the Azure portal, the Azure CLI, or Azure PowerShell by selecting the tab for the method you want to use.
If you want to instead create a new VM with a public IP address, you can use the Azure portal, the Azure CLI, or Azure PowerShell.
Public IP addresses have a nominal fee. For details, see pricing. There's a limit to the number of public IP addresses that you can use per subscription. For details, see limits.
Note
Azure provides a default outbound access IP for VMs that either aren't assigned a public IP address or are in the backend pool of an internal basic Azure load balancer. The default outbound access IP mechanism provides an outbound IP address that isn't configurable.
The default outbound access IP is disabled when one of the following events happens:
- A public IP address is assigned to the VM.
- The VM is placed in the backend pool of a standard load balancer, with or without outbound rules.
- An Azure NAT Gateway resource is assigned to the subnet of the VM.
VMs that you create by using virtual machine scale sets in flexible orchestration mode don't have default outbound access.
For more information about outbound connections in Azure, see Default outbound access in Azure and Use Source Network Address Translation (SNAT) for outbound connections.
Sign in to the Azure portal.
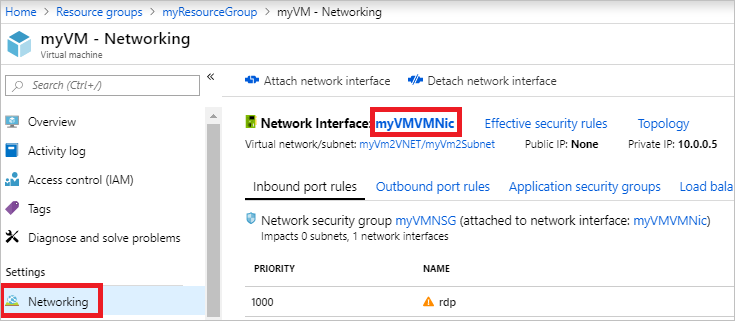
In the portal, search for and select the VM that you want to add the public IP address to.
Under Settings in the left pane, select Networking, and then select the network interface you want to add the public IP address to.
Note
Public IP addresses are associated to the network interfaces that are attached to a VM. In this screenshot, the VM has only one network interface. If the VM had multiple network interfaces, they would all appear, and you'd select the network interface you want to associate the public IP address to.
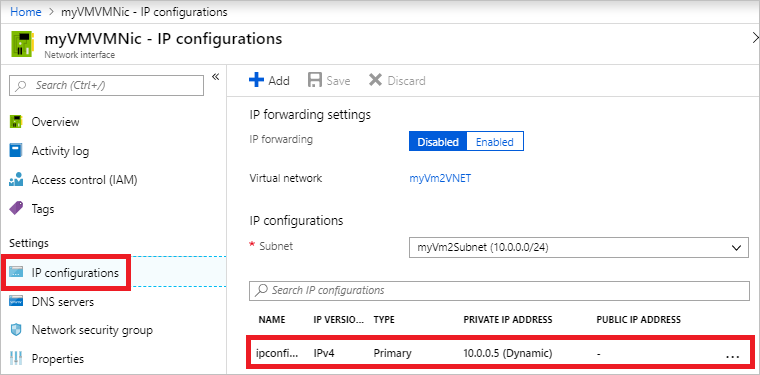
From the Network interface window, under Settings, select IP configurations*, and then select an IP configuration from the list.
Note
Public IP addresses are associated to the IP configurations for a network interface. In this screenshot, the network interface has only one IP configuration. If the network interface had multiple IP configurations, they would all appear in the list, and you'd select the IP configuration that you want to associate the public IP address to.
In the Edit IP configuration window, select Associate public IP address, then select Public IP address to choose an existing public IP address from the drop-down list. If no public IP addresses are listed, you need to create one. To learn how, see Create a public IP address.

Note
The public IP addresses that appear in the drop-down list are those that exist in the same region as the VM. If you have multiple public IP addresses created in the region, all will appear here. Any address that's already associated to a different resource is grayed out.
Select Save.
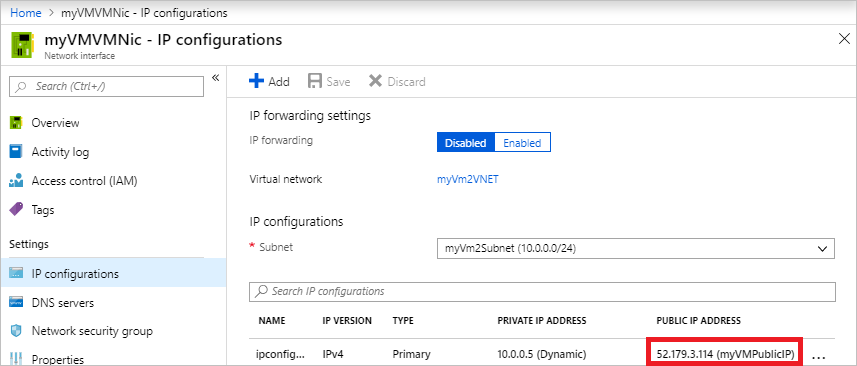
In the IP Configurations window, view the public IP address assigned to the IP configuration. It might take a few seconds for a newly associated IP address to appear.
Note
An IP address is assigned from the pool of public IP addresses reserved for an Azure region. For a list of the address pools used in each region, see Azure IP ranges and service tags. If you need the address to be assigned from a specific prefix, use a Public IP address prefix.
Open the necessary ports in your security groups by adjusting the security rules in the network security groups. For information, see Allow network traffic to the VM.
Install the Azure CLI on your machine, or use Azure Cloud Shell. Cloud Shell is a free Bash shell that you can run directly within the Azure portal. It includes the Azure CLI preinstalled and configured to use with your Azure account. Select the Open Cloudshell button in the Azure CLI code examples that follow. When you select Open Cloudshell, Cloud Shell loads in your browser and prompts you to sign into your Azure account.
If you're using the Azure CLI locally in Bash, sign in to Azure with az login.
Use the az network nic ip-config update command to associate a public IP address to an IP configuration. The following example associates an existing public IP address named myPublicIP to an IP configuration named ipconfig1. This IP configuration belongs to an existing network interface named myVMNic in a resource group named myResourceGroup.
az network nic ip-config update \
  --name ipconfig1 \
  --nic-name myVMNic \
  --resource-group myResourceGroup \
  --public-ip-address myPublicIP
If you don't have an existing public IP address, use the az network public-ip create command to create one. For example, the following command creates a public IP address named myPublicIP in a resource group named myResourceGroup.
az network public-ip create --name myPublicIP --resource-group myResourceGroup
Note
This command creates a public IP address with default values for several settings that you may want to customize. For more information about public IP address settings, see Create a public IP address. An IP address is assigned from the pool of public IP addresses reserved for an Azure region. For a list of the address pools used in each region, see Azure IP ranges and service tags. If you need the address to be assigned from a specific prefix, use a Public IP address prefix.
If you don't know the names of the network interfaces attached to your VM, use the az vm nic list command to view them. For example, the following command lists the network interfaces attached to a VM named myVM in a resource group named myResourceGroup:
az vm nic list --vm-name myVM --resource-group myResourceGroup
The output includes one or more lines that are similar to the following example, where myVMNic is the name of the network interface:
"id": "/subscriptions/aaaa0a0a-bb1b-cc2c-dd3d-eeeeee4e4e4e/resourceGroups/myResourceGroup/providers/Microsoft.Network/networkInterfaces/myVMNic",
If you don't know the names of the IP configurations for a network interface, use the az network nic ip-config list command to retrieve them. For example, the following command lists the names of the IP configurations for a network interface named myVMNic in a resource group named myResourceGroup:
az network nic ip-config list --nic-name myVMNic --resource-group myResourceGroup --out table
View the public IP address assigned to the IP configuration with the az vm list-ip-addresses command. The following example shows the IP addresses assigned to an existing VM named myVM in a resource group named myResourceGroup.
az vm list-ip-addresses --name myVM --resource-group myResourceGroup --out table
Note
An IP address is assigned from the pool of public IP addresses reserved for an Azure region. For a list of the address pools used in each region, see Azure IP ranges and service tags. If you need the address to be assigned from a specific prefix, use a Public IP address prefix.
Open the necessary ports in your network security groups by adjusting the inbound security rules. For information, see Allow network traffic to the VM.
Install Azure PowerShell on your machine, or use Cloud Shell. Cloud Shell is a free Bash shell that you can run directly within the Azure portal. It includes Azure PowerShell preinstalled and configured to use with your Azure account. Select the Open Cloudshell button in the Azure PowerShell code examples that follow. When you select Open Cloudshell, Cloud Shell loads in your browser and prompts you to sign into your Azure account.
If you're using Azure PowerShell locally, sign in to Azure with Connect-AzAccount.
Use the Get-AzVirtualNetwork command to retrieve the virtual networks in a resource group. Then, use the Get-AzVirtualNetworkSubnetConfig command to retrieve the subnet configurations in a virtual network.
Use the Get-AzNetworkInterface command to retrieve the network interfaces in a resource group. Then, use the Get-AzPublicIpAddress command to retrieve the existing public IP addresses in a resource group.
Use the Set-AzNetworkInterfaceIpConfig command to associate the public IP address to the IP configuration. Then, use the Set-AzNetworkInterface command to write the new IP configuration to the network interface.
The following example associates an existing public IP address named myPublicIP to an IP configuration named ipconfig1. This IP configuration belongs to an existing network interface named myVMNic that exists in a subnet named mySubnet in a virtual network named myVNet. All resources are in a resource group named myResourceGroup.
$vnet = Get-AzVirtualNetwork -Name myVNet -ResourceGroupName myResourceGroup
$subnet = Get-AzVirtualNetworkSubnetConfig -Name mySubnet -VirtualNetwork $vnet
$nic = Get-AzNetworkInterface -Name myVMNic -ResourceGroupName myResourceGroup
$pip = Get-AzPublicIpAddress -Name myPublicIP -ResourceGroupName myResourceGroup
$nic | Set-AzNetworkInterfaceIpConfig -Name ipconfig1 -PublicIPAddress $pip -Subnet $subnet
$nic | Set-AzNetworkInterface
If you don't have an existing public IP address, use the New-AzPublicIpAddress command to create one. For example, the following command creates a dynamic public IP address named myPublicIP in a resource group named myResourceGroup in the eastus region.
New-AzPublicIpAddress -Name myPublicIP -ResourceGroupName myResourceGroup -AllocationMethod Dynamic -Location eastus
Note
This command creates a public IP address with default values for several settings that you may want to customize. For more information about public IP address settings, see Create a public IP address. An IP address is assigned from the pool of public IP addresses reserved for an Azure region. For a list of the address pools used in each region, see Azure IP ranges and service tags. If you need the address to be assigned from a specific prefix, use a Public IP address prefix.
If you want to know the names and properties of the network interfaces attached to your VM, use the Get-AzVM command to view them. For example, the following command lists the network interfaces attached to a VM named myVM in a resource group named myResourceGroup:
$vm = Get-AzVM -name myVM -ResourceGroupName myResourceGroup
$vm.NetworkProfile
The output includes one or more lines that are similar to the example that follows. In the example output, myVMNic is the name of the network interface.
"id": "/subscriptions/00000000-0000-0000-0000-000000000000/resourceGroups/myResourceGroup/providers/Microsoft.Network/networkInterfaces/myVMNic",
To retrieve the names of the virtual networks or subnets that a network interface is in, use the Get-AzNetworkInterface command. For example, the following command gets the virtual network and subnet information for a network interface named myVMNic in a resource group named myResourceGroup:
$nic = Get-AzNetworkInterface -Name myVMNic -ResourceGroupName myResourceGroup
$ipConfigs = $nic.IpConfigurations
$ipConfigs.Subnet | Select Id
The output includes one or more lines that are similar to the example that follows. In the example output, myVNet is the name of the virtual network and mySubnet is the name of the subnet.
"/subscriptions/00000000-0000-0000-0000-000000000000/resourceGroups/myResourceGroup/providers/Microsoft.Network/virtualNetworks/myVNet/subnets/mySubnet",
To retrieve the names of the IP configurations for a network interface, use the Get-AzNetworkInterface command. For example, the following command lists the names of the IP configurations for a network interface named myVMNic in a resource group named myResourceGroup:
$nic = Get-AzNetworkInterface -Name myVMNic -ResourceGroupName myResourceGroup
$nic.IPConfigurations
The output includes one or more lines that are similar to the example that follows. In the example output, ipconfig1 is the name of an IP configuration.
Id : /subscriptions/00000000-0000-0000-0000-000000000000/resourceGroups/myResourceGroup/providers/Microsoft.Network/networkInterfaces/myVMNic/ipConfigurations/ipconfig1
View the public IP address assigned to the IP configuration with the Get-AzPublicIpAddress command. The following example retrieves the addresses assigned to a public IP address named myPublicIP in a resource group named myResourceGroup.
Get-AzPublicIpAddress -Name myPublicIP -ResourceGroupName myResourceGroup | Select IpAddress
For a list of the public IP addresses assigned to an IP configuration, run the following commands:
$nic = Get-AzNetworkInterface -Name myVMNic -ResourceGroupName myResourceGroup
$nic.IPConfigurations
$address = $nic.IPConfigurations.PublicIpAddress
$address | Select Id
The output includes one or more lines that are similar to the example that follows. In the example output, myPublicIP is the name of the public IP address assigned to the IP configuration.
"/subscriptions/00000000-0000-0000-0000-000000000000/resourceGroups/myResourceGroup/providers/Microsoft.Network/publicIPAddresses/myPublicIP"
Note
An IP address is assigned from the pool of public IP addresses reserved for an Azure region. For a list of the address pools used in each region, see Azure IP ranges and service tags. If you need the address to be assigned from a specific prefix, use a Public IP address prefix.
Open the necessary ports in your network security groups by adjusting the inbound security rules. For information, see Allow network traffic to the VM.
Note
To share a VM with an external user, you must add a public IP address to the VM. Alternatively, external users can connect to VM's private IP address through Azure Bastion.
Allow network traffic to the VM
Before you can connect to a public IP address from the internet, you must open the necessary ports/protocols in your network security groups. These ports must be open in any network security group that you might have associated to the network interface, the subnet of the network interface, or both. Although network security groups filter traffic to the private IP address of the network interface, after inbound internet traffic arrives at the public IP address, Azure translates the public address to the private IP address. Therefore, if a network security group prevents the traffic flow, the communication with the public IP address fails.
You can view the effective security rules for a network interface and its subnet for the Azure portal, the Azure CLI, or Azure PowerShell.
- If a new public IP address is added to the VM and traffic needs to switch over to the new IP address, the VM needs to be restarted as this will reset all existing flows.
In this article, you learned how to associate a public IP address to a VM using the Azure portal, Azure CLI, or Azure PowerShell.