Office 365 Data Subject Requests for the GDPR and CCPA
Introduction to DSRs
The European Union General Data Protection Regulation (GDPR) gives rights to people (known in the regulation as data subjects) to manage the personal data that has been collected by an employer or other type of agency or organization (known as the data controller or just controller). Personal data is defined broadly under the GDPR as any data that relates to an identified or identifiable natural person. The GDPR gives data subjects specific rights to their personal data; these rights include obtaining copies of it, requesting changes to it, restricting the processing of it, deleting it, or receiving it in an electronic format so it can be moved to another controller. A formal request by a data subject to a controller to take an action on their personal data is called a Data Subject Request or DSR. The controller is obligated to promptly consider each DSR and provide a substantive response either by taking the requested action or by providing an explanation for why the DSR can't be accommodated by the controller. A controller should consult with its own legal or compliance advisors regarding the proper disposition of any given DSR.
Similarly, the California Consumer Privacy Act (CCPA), provides privacy rights and obligations to California consumers, including rights similar to GDPR's Data Subject Rights, such as the right to delete, access, and receive (portability) their personal information. The CCPA also provides for certain disclosures, protections against discrimination when electing exercise rights, and "opt-out/ opt-in" requirements for certain data transfers classified as "sales." Sales are broadly defined to include the sharing of data for a valuable consideration. For more information about the CCPA, see the California Consumer Privacy Act and the California Consumer Privacy Act FAQ.
This guide discusses how to use the Office 365 features and administrative tools that are generally available to all Office 365 customers, to help you find and act on personal data or personal information to respond to DSRs. Specifically, this includes how to find, access, and act on personal data or personal information that resides in Microsoft's cloud.
Your organization may subscribe to Microsoft Priva, which offers additional complementary functionality related to investigating and servicing a DSR. You aren't required to subscribe to Microsoft Priva to use the features described in the following sections to research and respond to DSRs. For more information about getting started with Microsoft Priva, see Learn about Microsoft Priva.
Here's a quick overview of the processes outlined in this guide:
- Discover: Use search and discovery tools to more easily find customer data that may be the subject of a DSR. Once potentially responsive documents are collected, you can perform one or more of the DSR actions described in the following steps to respond to the request. Alternatively, you may determine that the request doesn't meet your organization's guidelines for responding to DSRs.
- Access: Retrieve personal data that resides in the Microsoft cloud and, if requested, make a copy of it that can be available to the data subject.
- Rectify: Make changes or implement other requested actions on the personal data, where applicable.
- Restrict: Restrict the processing of personal data, either by removing licenses for various Microsoft cloud services or turning off the desired services where possible. You can also remove data from the Microsoft cloud and retain it on-premises or at another location.
- Delete: Permanently remove personal data that resided in the Microsoft cloud.
- Export/Receive (Portability): Provide an electronic copy (in a machine-readable format) of personal data or personal information to the data subject. Personal information under the CCPA is any information relating to an identified or identifiable person. There's no distinction between a person's private, public, or work roles. The defined term "personal information" roughly lines up with "personal data" under GDPR. However, the CCPA also includes family and household data. For more information about the CCPA, see the California Consumer Privacy Act and the California Consumer Privacy Act FAQ.
Terminology
Here are definitions of terms from the GDPR that are relevant to this guide.
- Controller: The natural or legal person, public authority, agency or other body which, alone or jointly with others, determines the purposes and means of the processing of personal data; where the purposes and means of such processing are determined by Union or Member State law, the controller, or the specific criteria for its nomination may be provided for by Union or Member State law.
- Personal data and data subject: Any information relating to an identified or identifiable natural person ('data subject'); an identifiable natural person is one who can be identified, directly or indirectly, in particular by reference to an identifier such as a name, an identification number, location data, an online identifier or to one or more factors specific to the physical, physiological, genetic, mental, economic, cultural, or social identity of that natural person.
- Processor: A natural or legal person, public authority, agency, or other body, which processes personal data on behalf of the controller.
- Customer Data: All data, including all text, sound, video, or image files, and software that is provided to Microsoft by or on behalf of, a customer through use of the enterprise service. Customer Data includes both (1) identifiable information of end users (for example, user names and contact information in Microsoft Entra ID) and Customer Content that a customer uploads into or creates in specific services (for example, customer content in a Word or Excel document, or in the text of an Exchange Online email; customer content added to a SharePoint site, or saved to a OneDrive for work or school account).
- System-Generated Logs: Logs and related data generated by Microsoft that help Microsoft provide enterprise services to users. System-generated logs contain primarily pseudonymized data, such as unique identifiers (typically a number generated by the system) can't on its own identify an individual person but is used to deliver the enterprise services to users.
How to use this guide
To help you find information relevant to your use case, this guide is divided into four parts.
- Part 1: Responding to DSRs for Customer Data: Customer Data is data produced and stored in Office 365 in the day-to-day operations of running your business. Examples of the most commonly used Office 365 applications that allow you to author data include Word, Excel, PowerPoint, Outlook, and OneNote. Office 365 also consists of applications such as SharePoint, Teams, and Forms that allow you to better collaborate with others. Part 1 of this guide discusses how to discover access, rectify, restrict, delete, and export data from Office 365 applications that have been used to author and store data in Office 365 online services. It addresses products and services for which Microsoft is acting as a data processor to your organization, and thus DSR capability is made available to your tenant administrator.
- Part 2: Responding to DSRs with Respect to Insights Generated by Office 365: Office 365 provides certain insights through services like Delve, Viva Personal Insights, and Viva Manager. How these insights are generated and how to respond to DSRs related to them are explained in Part 2 of this guide.
- Part 3: Responding to DSRs for system-generated Logs: When you use Office 365 enterprise services, Microsoft generates some information such as service logs that record the use or performance of features in the online services. Most service-generated data contain pseudonymous identifiers generated by Microsoft and this category is thus generally referred to within this document as system-generated logs. Although this data can't be attributed to a specific data subject without the use of additional information, some of it may be deemed personal under GDPR's definition for "personal data." Part 3 of this guide discusses how to access, delete, and export system-generated logs.
- Part 4: Additional resources to assist you with DSRs: Part 4 of this guide lists limited scenarios in which Microsoft is the data controller when certain Office 365 products and services are used.
Note
In most cases, when users in your organization use Microsoft Office 365 products and services, you are the data controller and Microsoft is the processor. As a data controller, you are responsible for responding to the data subject directly. To assist you with this, Parts 1-3 of this guide detail the technical capabilities available to your organization to respond to a DSR request. In some limited scenarios, however, Microsoft will be the data controller when people use certain Office 365 products and services. In these cases, the information in Part 4 provides guidance on how data subjects can submit DSR requests to Microsoft.
Office 365 national clouds
The Microsoft Office 365 services are also available in the following national cloud environments: Office 365 operated by 21Vianet (China), and Office 365 US Government. Most of the guidance for managing data subject requests described in this document applies to these national cloud environments. However, due to the isolated nature of these environments, there are some exceptions. Where notable for a given subsection, these exceptions are called out in a corresponding note.
Hybrid deployments
Your organization may consist of Microsoft offerings that are a combination of cloud-based services and on-premises server products. In general, a hybrid deployment is typically the sharing of user accounts (identity management) and resources (such as mailboxes, web sites, and data) that exist in the cloud and on-premises. Common hybrid scenarios include:
- Exchange hybrid deployments, where some users have an on-premises mailbox and other users have Exchange Online mailboxes.
- SharePoint hybrid deployments, where site and file servers are on-premises and OneDrive for work or school accounts are in Office 365.
- The on-premises identity management system (Active Directory) that is synchronized with Azure Activity Directory, which is the underlying directory service in Office 365.
When responding to a DSR request, you may have to determine if data that's responsive to a DSR request is in the Microsoft cloud or in your on-premise organization, and then take the appropriate steps to respond to that request. The Office 365 Data Subject Request Guide (this guide) provides guidance for responding to cloud-based data. For guidance for data in your on-premises organization, see GDPR for Office on-premises Servers.
Part 1: Responding to DSRs for Customer Data
The guidance for responding to DSRs for Customer Data is divided into the following four sections:
- Using the Content Search eDiscovery tool to respond to DSRs
- Using In-App functionality to respond to DSRs
- Responding to DSR rectification requests
- Responding to DSR restriction requests
How to determine the Office 365 applications that may be in scope for a DSR for Customer Data
To help you determine where to search for personal data or what to search for, it helps to identify the Office 365 applications that people in your organization can use to create and store data in Office 365. Knowing this narrows the Office 365 applications that are in-scope for a DSR and helps you determine how to search for and access personal data that's related to a DSR. Specifically, this means whether you can use the Content Search tool or if you'll have to use the in-app functionality of the application the data was created in.
A quick way to identify the Office 365 applications that people in your organization are using to create Customer Data is to determine which applications are included in your organization's Microsoft 365 for business subscription. To do this, you can access user accounts in the Office 365 admin portal and look at the product licensing information. See Assign licenses to users.
Using the Content Search eDiscovery tool to respond to DSRs
When looking for personal data within the larger set of data your organization creates and stores using in Office 365, you may want to first consider which applications people have most likely used to author the data you're looking for. Microsoft estimates that over 90% of an organization's data that is stored in Office 365 is authored in Word, Excel, PowerPoint, OneNote, and Outlook. Documents authored in these Office applications, even if purchased through Microsoft 365 Apps for enterprise or an Office perpetual license, are most likely stored on a SharePoint site, in a user's OneDrive for work and school account, or in a user's Exchange Online mailbox. That means you can use the Content Search eDiscovery tool to search (and perform other DSR-related actions) across SharePoint sites, OneDrive for work and school accounts, and Exchange Online mailboxes (including the sites and mailboxes associated with Microsoft 365 Groups, Microsoft Teams, EDU Assignments) to find documents and mailbox items that may be relevant to the DSR you're investigating. You can also use the Content Search tool to discover Customer Data authored in other Office 365 applications.
The following list identifies the Office 365 applications that people use to create Customer Authored Content and that can be discovered by using Content Search. This section of the DSR guide provides guidance about how to discover, access, export, and delete data created with these Office 365 applications.
Applications where Content Search can be used to find Customer Data:
- Calendar
- Excel
- Office Lens
- OneDrive for work and school
- OneNote
- Outlook/Exchange
- People
- PowerPoint
- SharePoint
- Skype for Business
- Tasks
- Teams
- To Do
- Video
- Visio
- Word
Note
The Content Search eDiscovery tool is not available in Office 365 operated by 21Vianet (China). This means you won't able to use this tool to search for and export Customer Data in the Office 365 applications shown in Table 1. However, you can use the In-Place eDiscovery tool in Exchange Online to search for content in user mailboxes. You can also use the eDiscovery Center in SharePoint to search for content in SharePoint sites and OneDrive accounts. Alternatively, you can ask a document owner to help you find and make changes or deletions to content or export it if necessary. For more information, see:
Using Content Search to find personal data
The first step in responding to a DSR is to find the personal data that is the subject of the DSR. This consists of using Office 365 eDiscovery tools to search for personal data (among all your organization's data in Office 365) or going directly to the native application in which the data was created. This first step, finding and reviewing the personal data at issue, will help you determine whether a DSR meets your organization's requirements for honoring or declining a data subject request. For example, after finding and reviewing the personal data at issue, you may determine the request doesn't meet your organization's requirements because doing so may adversely affect the rights and freedoms of others, or because the personal data is contained in a business record your organization has a legitimate business interest in retaining.
As previously stated, Microsoft estimates that over 90% of an organization's data is created with Office applications, such as Word and Excel. This means that you can use the Content Search in the Microsoft Purview compliance portal to search for most DSR-related data.
This guide assumes that you or the person searching for personal data that may be responsive to a DSR request is familiar with or has experience using the Content Search tool in the Microsoft Purview compliance portal. For general guidance on using Content Search, see Content Search in Office 365. Be sure that the person running the searches has been assigned the necessary permissions in the Microsoft Purview compliance portal. This person should be added as a member of the eDiscovery Manager role group in compliance portal; see Assign eDiscovery permissions in the Microsoft Purview compliance portal. Consider adding other people in your organization who are involved in investigating DSRs to the eDiscovery Manager role group, so they can perform the necessary actions in the Content Search tool such as previewing and exporting search results. However, unless you set up compliance boundaries (as described here) be aware that an eDiscovery Manager can search all content locations in your organization, including ones that may not be related to a DSR investigation.
After you find the data, you can then perform the specific action to satisfy the request by the data subject.
Searching content locations
You can search the following types of content locations with the Content Search tool.
- Exchange Online mailboxes. This includes the mailboxes associated with Microsoft 365 Groups and Microsoft Teams
- Exchange Online public folders
- SharePoint sites. This includes the sites associated with Microsoft 365 Groups and Microsoft Teams
- OneDrive for work and school accounts
Note
This guide assumes that all data that might be relevant to a DSR investigation is stored in Office 365; in other words, stored in the Microsoft cloud. Data stored on a user's local computer or on-premises on your organization's file servers is outside the scope of a DSR investigation for data stored in Office 365. For guidance about responding to DSR requests for data in on-premises organizations, see GDPR for Office on-premises Servers.
Tips for searching content locations
- Begin by searching all content locations in your organization (which you can search in a single search) to quickly determine which content locations contain items that match your search query. Then you can rerun the search and narrow the search scope to the specific locations that contain relevant items.
- Use search statistics to identify the top locations that contain items that match your search query. See View keyword statistics for Content Search results.
- Search the audit log for recent file and folder activities performed by the user who is the subject of the DSR. Searching the audit log returns a list of auditing records that contain the name and location of resources the user has recently interacted with. You may be able to use this information to build a content search query. See Search the audit log in the Microsoft Purview compliance portal.
Building search queries to find personal data
The DSR you're investigating most likely contains identifiers that you can use in the keyword search query to search for the personal data. Here are some common identifiers that can be used in a search query to find personal data:
- Email address or alias
- Phone number
- Mailing address
- Employee ID number
- National ID number or EU member version of a Social Security Number
The DSR that you're investigating most likely will have an identifier and other details about the personal data that is the subject of the request that you can use in a search query.
Searching for just an email address or employee ID will probably return many results. To narrow the scope of your search so it returns content most relevant to the DSR, you can add conditions to the search query. When you add a condition, the keyword and a search condition are logically connected by the AND Boolean operator. This means only items that match both the keyword and the condition will be returned in the search results.
The following table lists some conditions you can use to narrow the scope of a search. The table also lists the values that you can use for each condition to search for specific document types and mailbox items.
Table 2: Narrow scope of search by using conditions
| Condition | Description | Example of condition value |
|---|---|---|
| File type | The extension of a document or file. Use this condition to search for Office documents and files created by Office 365 applications. Use this condition when searching for documents on SharePoint sites and OneDrive for work and school accounts. The corresponding document property is filetype. For a complete list of file extensions that you can search for, see that Default crawled file name extensions and parsed file types in SharePoint](https://technet.microsoft.com/library/jj219530.aspx). |
• csv — Searches for comma-separated value (CSV) files; Excel files can be saved in CSV format and CSV file can easily be imported into Excel • docx — Searches for Word file • mpp — Searches for Project files • one — Searches for OneNote files • pdf — Search for files saved in a PDF format • pptx — Searches for PowerPoint files • xlxs — Searches for Excel files • vsd — Searches for Visio files • wmv — Searches for Windows Media video files |
| Message type | The email message type to search for. Use this condition to search mailboxes for contacts (People), meetings (Calendar) tasks, or Skype for Business conversations. The corresponding email property is kind. | • *contacts — Searches the My Contacts list (People) of a mailbox • *email — Searches email messages • *im — Searches Skype for Business conversations • *meetings — Searches appointments and meeting requests (Calendar) • *tasks — Searches the My Tasks list (Tasks); using this value will also return tasks created in Microsoft To Do. |
| Compliance tag | The label assigned to an email message or a document. Labels are used to classify email and documents for data governance and enforce retention rules based on the classification defined by the label. Use this condition to search for items that have been automatically or manually assigned a label. This is a useful condition for DSR investigations because your organization may be using labels to classify content related to data privacy or that contains personal data or sensitive information. See the "Using Content Search to find all content with a specific label applied to it" section in Learn about retention policies and retention labels |
compliancetag="personal data" |
There are many more email and document properties and search conditions that you can use to build more complex search queries. See the following sections in the Keyword queries and search conditions for Content Search help article for more information.
Searching for personal data in SharePoint lists, discussions, and forms
In addition to searching for personal data in documents, you can also use Content Search to search for other types of data that's created by using native SharePoint apps. This includes data created by using SharePoint lists, discussions, and forms. When you run a Content Search and search SharePoint sites (or OneDrive for work and school accounts) data from lists, discussions, and forms that match the search criteria will be returned in the search results.
Examples of search queries
Here are some examples of search queries that use keywords and conditions to search for personal data in response to a DSR. The examples show two versions of the query: one showing the keyword syntax (where the condition is included in Keyword box) and one showing the GUI-based version of the query with conditions.
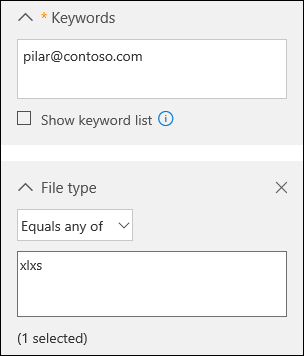
Example 1
This example returns Excel files on SharePoint sites and OneDrive for work and school accounts that contain the specified email address. Files might be returned if the email address appears in the file metadata.
Keyword syntax
pilar@contoso.com AND filetype="xlxs"
GUI
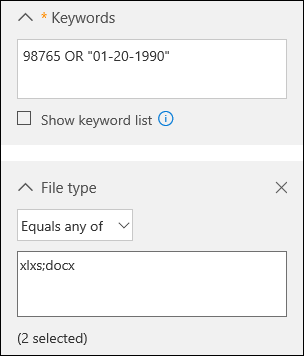
Example 2
This example returns Excel or Word files on SharePoint sites and OneDrive for work and school accounts that contain the specified employee ID or birth date.
(98765 OR "01-20-1990") AND (filetype="xlxs" OR filetype="docx")
GUI
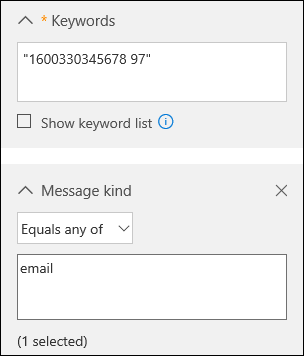
Example 3
This example returns email messages that contain the specified ID number, which is a France Social Security Number (INSEE)
"1600330345678 97" AND kind="email"
GUI
Working with partially indexed items in Content Search
Partially indexed items (also called unindexed items) are Exchange Online mailbox items and documents on SharePoint and OneDrive for work and school sites that for some reason weren't indexed for search, which means they aren't searchable by using Content Search. Most email messages and site documents are successfully indexed because they fall within the indexing limits for Office 365. The reasons that email messages or files aren't indexed for search include:
- The file type is unrecognized or unsupported for indexing. Though sometimes the file type is supported for indexing but an indexing error occurred for a specific file
- Email messages have an attached file without a valid handler, such as image file (this is the most common cause of partially indexed email items)
- Files attached to email messages are too large or there are too many attached files
We recommend that you learn more about partially indexed items so that you can work with them when responding to DSR requests. For more information, see:
- Partially indexed items in Content Search in Office 365
- Investigating partially indexed items in Office 365 eDiscovery
- Exporting unindexed items
Tips for working with partially indexed items
It's possible that data responsive to a DSR investigation may be in a partially indexed item. Here's some suggestions for working with partially indexed items:
After you run a search, the number of estimated partially items is displayed in the search statistics. This estimate doesn't include partially indexed items in SharePoint and OneDrive for work and school. Export the reports for a Content Search to get information about partially indexed items. The Unindexed Items.csv report contains information about unindexed items, including the location of the item, the URL if the item is in SharePoint or OneDrive for work and school, and the subject line (for messages) or name of the document. For more information, see Export a Content Search report.
The statistics and list of partially indexed items that are returned with the results of a Content Search are all the partially items from the content locations that are searched.
To retrieve partially indexed items that are potentially responsive to a DSR investigation, you can do one of the following things:
Export all partially indexed items
You export both the results of a content search and the partially indexed items from the content location that were search. You can also export only the partially indexed items. Then you can open them in their native application and review the content. You have to use this option to export items from SharePoint and OneDrive for work and school. See Export Content Search results from the Microsoft Purview compliance portal.
Export a specific set of partially indexed items from mailboxes
Instead of exporting all partially indexed mailbox items from a search, you can rerun a Content Search to search for a specific list of partially indexed items, and then export them. You can do this only for mailbox items. See Prepare a CSV file for a targeted Content Search in Office 365.
Next steps
After you find the personal data that's relevant to the DSR, be sure to retain the specific Content Search that you used to find the data. You'll likely reuse this search to complete other steps in the DSR response process, such as obtaining a copy of it, exporting it, or permanently deleting it.
Additional considerations for selected applications
The following sections describe things you should keep in mind when searching for data in the following Office 365 applications.
- Office Lens
- OneDrive for work and school and SharePoint Experience Settings
- Microsoft Teams for Education
- Microsoft To Do
- Skype for Business
Office Lens
A person using Office Lens (a camera app supported by devices running iOS, Android, and Windows) can take a picture of whiteboards, hardcopy documents, business cards, and other things that contain a lot of text. Office Lens uses optical character recognition technology that extracts text in an image and save it to an Office document such as a Word, PowerPoint, and OneNote or to a PDF file. Users can then upload the file that contains the text from the image to their OneDrive for work and school account in Office 365. That means you can use the Content Search tool to search, access, delete, and export data in files that were created from an Office Lens image. For more information about Office Lens, see:
OneDrive for work and school and SharePoint experience settings
In addition to user-created files stored in OneDrive for work and school accounts and SharePoint sites, these services store information about the user that is used to enable various experiences. Users still in your organization can access much of this information by using in-product functionality. The following information provides guidance on how to access, view, and export OneDrive for work and school and SharePoint application data.
SharePoint user profiles
The user's Delve profile allows users to maintain properties stored in the SharePoint user profile, including birthday, mobile phone number (and other contact information), about me, projects, skills and expertise, schools and education, interests, and hobbies.
End users
End users can discover, access, and rectify SharePoint user profile data using the Delve profile experience. See View and update your profile in Office Delve for more details.
Another way for users to access their SharePoint profile data is to navigate to the edit profile page in their OneDrive for work and school account, which can be accessed by going to the EditProfile.aspx path under the OneDrive for work and school account URL. For example, for a user user1@contoso.com, the user's OneDrive for work and school account is at:
https://contoso-my.sharepoint.com/personal/user1\_contoso\_com/\_layouts/15/OneDrive.aspx
The URL for the edit profile page would be:
https://contoso-my.sharepoint.com/personal/user1\_contoso\_com/\_layouts/15/EditProfile.aspx
Properties sourced in Microsoft Entra ID can't be changed within SharePoint. However, users can go to their Account page by selecting their photo in the Office 365 header, and then selecting My account. Changing the properties here may require users to work with their admins to discover, access, or rectify a user profile property.
Admins
An admin can access and rectify profile properties in the SharePoint admin center. In the SharePoint admin center, select the user profiles tab. select Manage user profiles, enter a user's name, and then select Find. The admin can right-select any user and select Edit My Profile. Properties sourced in Microsoft Entra ID can't be changed within SharePoint.
An admin can export all User Profile properties for a user by using the Export-SPOUserProfile cmdlet in SharePoint PowerShell. See Export-SPOUserProfile.
For more information about user profiles, see Manage user profiles in the SharePoint admin center.
User Information list on SharePoint sites
A subset of a user's SharePoint user profile is synchronized to the User information list of every site that they visit or have permissions to access. This is used by SharePoint experiences, such as People columns in document libraries, to display basic information about the user, such as the name of the creator of a document. The data in a User Information list matches the information stored in SharePoint user profile and will be automatically rectified if the source is changed. For deleted users, this data remains in the sites they interacted with for referential integrity of SharePoint column fields.
Admins can control which properties are replicable inside the SharePoint admin center. To do this:
- Go to the SharePoint admin center and select the user profiles tab.
- select Manage User Properties to see a list of properties.
- Right-select any property and select Edit and adjust various settings.
- Under Policy Settings, the replicable property controls whether the property will be represented in the User information list. Not all properties support adjusting this.
An admin can export all User information properties for a user on a given site by using the Export-SPOUserInfo cmdlet in SharePoint PowerShell. See Export-SPOUserInfo.
OneDrive for work and school experience settings
A user's OneDrive for work and school experience stores information to help the user find and navigate content of interest to them. Most of this information can be accessed by end users using in-product features. An admin can export the information using a PowerShell Script and SharePoint Client-Side Object Model (CSOM) commands.
See Export OneDrive for work and school experience settings for more information about the settings, how they're stored, and how to export them.
OneDrive for work and school and SharePoint search
The in-app search experience in OneDrive for work and school and SharePoint stores a user's search queries for 30 days to increase relevance of search results. An admin can export search queries for a user by using the Export-SPOQueryLogs cmdlet in SharePoint PowerShell. See Export-SPOQueryLogs.
Microsoft Teams for Education
Microsoft Teams for Education offers two additional collaboration features that teachers and students can use that creates and stores personal data: Assignments and OneNote Class Notebook. You can use Content Search to discover data in both.
Assignments
Students' files associated with an Assignment are stored in a document library in the corresponding Teams SharePoint site. IT admins can use the Content Search tool to search for student files that are related to assignments. For example, an admin could search all SharePoint sites in the organization and use the student's name and class or assignment name in the search query to find data relevant to a DSR.
There's other data related to Assignments that isn't stored in the class team SharePoint site, which means it's not discoverable with Content Search. This includes:
- Files that the teacher assigns to students as part of the assignment
- Student grades and feedback from the teacher
- The list of documents submitted for an assignment by each student
- Assignment metadata
For this type of data, an IT admin or data owner (such as a teacher) may have to go into the Assignment in the class team to find data relevant to a DSR.
OneNote Class Notebook
The OneNote Class Notebook is stored in the class team SharePoint site. Every student in a class has a private notebook that's shared with the teacher. There's also a content library where a teacher can share documents with students, and a collaboration space for all students in the class. Data related to these capabilities is discoverable with Content Search.
Here's specific guidance to search for a Class Notebook.
Run a Content Search using the following search criteria:
- Search all SharePoint sites
- Include the name of the class team as a search keyword; for example, "9C Biology."
Preview the search results and look for the item that corresponds to the Class Notebook.
Select that item, and then copy the folder path that's displayed in the details pane. This is the root folder for the Class Notebook.
Edit the search that you created in step 1 and replace the class name in the keyword query with the folder path of the Class Notebook and precede the folder path with the path site property; for example, path:
<https://contosoedu.onmicrosoft.com/sites/9C>Biology/SiteAssets/9C Biology Notebook/. Be sure to include the quotation marks and the trailing forward slash.Add a search condition and select the File Type condition and use one for the value of the file type. This returns all OneNote files in the search results. The resulting keyword syntax would look something like this:
path:"<https://contosoedu.onmicrosoft.com/sites/9C> Biology/SiteAssets/9C Biology Notebook/" AND filetype="one"Rerun the Content Search. The search results should include all OneNote files for the Class Notebook from the class team.
Microsoft To Do
Tasks (called to-dos, which are saved in to-do lists) in Microsoft To Do are saved as tasks in a user's Exchange Online mailbox. That means that you can use the Content Search tool to search, access, delete, and export to-dos. For more information, see Set up Microsoft To Do.
Skype for Business
Here some additional information about how to access, view, and export personal data in Skype for Business.
- Files attached to a meeting are retained in the actual meeting for 180 days and then become inaccessible. These files can be accessed by meeting participants by joining the meeting from the meeting request and then viewing or downloading the attached file. See the "Use the attachments in the meeting" section in Preload attachments for a Skype for Business meeting.
- Conversations in Skype for Business are retained in the Conversation History folder in user mailboxes. You can use Content Search to search mailboxes for data in Skype conversations.
- A data subject can export their contacts in Skype for Business. To do this, they would right-select a contact group in Skype for Business and select Copy. Then they can paste the list of email addresses into a text or Word document.
- If the Exchange Online mailbox of a meeting participant is placed on Litigation Hold or assigned to an Office 365 retention policy, files attached to a meeting are retained in the participants mailbox. You can use Content Search to search for those files in the participant's mailbox if the retention period for the file hasn't expired. For more information about retaining files, see Retaining large files attached to a Skype for Business meeting.
Providing a copy of personal data
After you've found personal data that is potentially responsive to a DSR, it's up to you and your organization to decide which data to provide the data subject. For example, you can provide them with a copy of the actual document, an appropriately redacted version, or a screenshot of the portions that you've deemed appropriate to share. For each of these responses to an access request, you'll have to retrieve a copy of the document or other item that contains the responsive data.
When providing a copy to the data subject, you may have to remove or redact personal information about other data subjects and any confidential information.
Using Content Search to get a copy of personal data
There are two ways to use the Content Search tool to get a copy of a document or mailbox item that you've found after running a search.
- Preview the search results and then download a copy of the document or item. This is a good way to download a few items or files.
- Export the search results and then download a copy of all items returned by the search. This method is more complex, but it's a good way to download lots of items that are responsive to the DSR. Useful reports are also included with you export search results. You can use these reports to get additional information about each item. The Results.csv report is useful because it contains a lot of information about the exported items, such as the exact location of the item (for example, the mailbox for email messages or the URL for documents or lists on SharePoint and OneDrive for work and school sites). This information helps you identify the owner of the item, in case you need to contact them during the DSR investigation process. For more information about the reports that are included when you export search results, see Export a Content Search report.
Preview and download items
After you run a new search or open an existing search, you can preview each item that matched the search query to verify that it's related to the DSR you're investigating. This also includes SharePoint lists and web pages that are returned in the search results. You can also download the original file if you have to provide it to the data subject. In both cases, you could take a screenshot to satisfy the data subject's request obtain the information.
Some types of items can't be previewed. If an item or file type isn't supported for preview, you have the option to download an individual item to your local computer or to a mapped network drive or other network location. You can only preview supported file types.
To preview and download items:
- Open the Content Search in the Microsoft Purview compliance portal.
- If the results aren't displayed, select Preview results.
- select an item to view it.
- select Download original file to download the item to your local computer. You'll also have to download items that can't be previewed.
For more information about previewing search results, see Preview search results.
Export and download items
You can also export the results of a content search to get a copy of email messages, documents, lists, and web pages containing the personal data, though this method is more involved than previewing items. See the next section for details about exporting the results of a Content Search.
Exporting personal data
The "right of data portability" allows a data subject to request an electronic copy of personal data that's in a "structured, commonly used, machine-readable format", and to request that your organization transmit these electronic files to another data controller. Microsoft supports this right in two ways:
- Offering Office 365 applications that save data in native, machine-readable, commonly used electronic format. For more information about Office file formats, see Office File Formats-Technical Documents.
- Enabling your organization to export the data in the native file format, or a format (such as CSV, TXT, and JSON) that can be easily imported to another application.
To meet a DSR export request, you can export Office documents in their native file format and export data from other Office 365 applications.
Export and download content using Content Search
When you export the results of a Content Search, email items can be downloaded as PST files or as individual messages (.msg files). When you export documents and lists from SharePoint and OneDrive for work and school sites, copies in the native file formats are exported. For example, SharePoint lists are exported as CSV files and Web pages are exported as .aspx or html files.
Note
Exporting mailbox items from a user's mailbox using Content Search requires that the user (whose mailbox you're exporting items from) is assigned an Exchange Online Plan 2 license.
To export and download items:
- Open the Content Search in the Microsoft Purview compliance portal.
- On the search fly out page, select
 More, and then select Export results. You can also export a report.
 - Complete the sections on the Export results fly out page. Be sure to use the scroll bar to view all export options.
- Go back to the Content search page in the Microsoft Purview compliance portal, and select the Export tab.
- select Refresh to update the page.
- Under the Name column, select the export job that you created. The name of the export job is the name of the content search appended with _Export.
- On the export fly out page, under Export key, select Copy to clipboard. You'll use this key in step 10 to download the search results
- On the top of the fly out page, select Download results.
- If you're prompted to install the Microsoft Office 365 eDiscovery Export Tool, select Install.
- In the eDiscovery Export Tool, paste the export key that you copied in step 7 in the appropriate box.
- select Browse to specify the location where you want to download the search result files.
- select Start to download the search results to your computer.
When the export process is complete, you can access the files in the location on your local computer where they were downloaded. Results of a content search are downloaded to a folder named after the Content Search. Documents from sites are copied to a subfolder named SharePoint. Mailbox items are copied to subfolder named Exchange.
For detailed step-by-step instructions, see Export Content Search results from the Microsoft Purview compliance portal.
Downloading documents and lists from SharePoint and OneDrive for work and school
Another way to export data from SharePoint and OneDrive for work and school is to download documents and lists directly from a SharePoint site or a OneDrive for work and school account. You would have to get assigned the permissions to access a site, and then go to the site and download the contents. See:
For some DSR export requests, you may want to allow the data subject to download content themselves. This enables the data subject to go to a SharePoint site or shared folder and select Sync to sync all contents in the document library or selected folders. See:
- Enable users to sync SharePoint files with the new OneDrive sync client
- Sync SharePoint files with the new OneDrive sync client
Deleting personal data
The "right to erasure" by the removal of personal data from an organization's Customer Data is a key protection in the GDPR. Removing personal data includes deleting entire documents or files or deleting specific data within a document or file (which would be an action and process like the ones described in the Rectify section in this guide).
As you investigate or prepare to delete personal data in response to a DSR, here are a few important things to understand about how data deletion (and retention) works in Office 365.
Soft delete vs. hard delete: In Office 365 services such as Exchange Online, SharePoint, and OneDrive for work and school there's the concept of soft deletion and hard deletion, which relates to the recoverability of a deleted item (usually for a limited period) before it's permanently removed from the Microsoft cloud with no chance of recovery. In this context, a soft-deleted item can be recovered by a user and/or an admin for a limited amount of time before it's hard-deleted. When an item has been hard-deleted, it's marked for permanent removal and is purged when it's processed by the corresponding Office 365 service. Here's how soft delete and hard delete works for items in mailboxes and sites (regardless of whether the data owner or an admin deletes an item):
Mailboxes: An item is soft-deleted when it's deleted from the Deleted Items folder or when a user deletes an item by pressing Shift + Delete. When item is soft-deleted, it's moved to the Recoverable Items folder in the mailbox. At this point, the item can be recovered by the user until the deleted item retention period expires (in Office 365, the deleted item retention period is 14 days, but can be increased up to 30 days by an admin). After the retention period expires, the item is hard-deleted and moved to a hidden folder (called the Purges folder). The item will be permanently removed (purged) from Office 365 the next time the mailbox is processed (mailboxes are processed once every seven days).
SharePoint and OneDrive for work and school sites: When a file or documented is deleted, it's moved to the site's Recycle Bin (also called the first-stage Recycle Bin (which is like the Recycle Bin in Windows). The item remains in the Recycle Bin for 93 days (the deleted item retention period for sites in Office 365). After that period, the item is automatically moved to Recycle Bin for the site collection, which also called the second-stage Recycle Bin. (Note that users or admins--with the appropriate permissions--can also delete items from the first-stage Recycle Bin). At this point, the item becomes soft-deleted; it can still be recovered by a site collection administrator in SharePoint or by the user or admin in OneDrive for work and school). When an item is deleted from the second-stage Recycle Bin (either manually or automatically), it becomes hard-deleted and isn't accessible by user or an admin. The retention period is 93 days for both the first-stage and second-stage recycle bins. That means the second-stage Recycle Bin retention starts when the item is first deleted. Therefore, the total maximum retention time is 93 days for both recycle bins.
Note
Understanding the actions that result in an item being soft-deleted or hard-deleted will help you determine how to delete data in a way that meets GDPR requirements when responding to a deletion request.
- Legal holds and retention policies: In Office 365, a "hold" can be place on mailboxes and sites. In short, this means that nothing is permanently removed (hard-deleted) if a mailbox or site is on hold, until the retention period for an item expires or until the hold is removed. This is important in the context of deleting Customer Content in response to a DSR: if an item is hard-deleted from a content location that is on hold, the item isn't permanently removed from Office 365. That means it could conceivably be recovered by an IT admin. If your organization has a requirement or policy that data be permanently deleted and unrecoverable in Office 365 in response to DSR, then a hold would have to be removed from a mailbox or site to permanently delete data in Office 365. More than likely, your organization's guidelines for responding to DSRs have a process in place to determine whether a specific DSR deletion request or a legal hold takes precedence. If a hold is removed to delete items, it can be reimplemented after the item is deleted.
Deleting documents in SharePoint and OneDrive for work and school
After you find the document on a SharePoint site or in a OneDrive for work and school account (by following the guidance in Discover section of this guide) that needs to be deleted, a data privacy officer or IT admin would need to be assigned the necessary permissions to access the site and delete the document. If appropriate, the document owner can also be instructed to delete the document.
Here's the high-level process for deleting documents from sites.
- Go to the site and locate the document.
- Delete the document. When you delete a document from a site, it's sent to the first-stage Recycle Bin.
- Go to the first-stage Recycle Bin (the site Recycle Bin) and delete the same document you deleted in the previous step. The document is sent to the second-stage Recycle Bin. At this point, the document is soft-deleted.
- Go to the second-stage Recycle Bin (which is the site collection Recycle Bin) and delete the same document that you deleted from the first-stage Recycle Bin. At this point, the document is hard-deleted.
Important
You can't delete a document that is located on a site that is on hold (with one of the retention or legal hold features in Office 365). In the case where a DSR delete request takes precedence over a legal hold, the hold would have to be removed from the site before a document could be permanently deleted.
See the following articles for detailed procedures.
- Delete a file, folder, or link from a SharePoint document library
- Delete items or empty the Recycle Bin of a SharePoint site
- Delete items from the site collection recycle bin
- "Get access to the former employee's OneDrive for work and school documents" section in Get access to and back up a former user's data
- Delete files or folders in OneDrive for work and school
- Delete a list in SharePoint
- Delete list items in SharePoint
Deleting a SharePoint site
You may determine that the best way to respond to a DSR delete request is to delete an entire SharePoint site, which will delete all that data located in the site. You can do this by running cmdlets in SharePoint PowerShell.
- Use the Remove-SPOSite cmdlet to delete the site and move it the SharePoint Recycle Bin (soft-delete).
- Use the Remove-SPODeletedSite cmdlet to permanently delete the site (hard-delete).
You can't delete a site that is placed on an eDiscovery hold or is assigned to a retention policy. Sites must be removed from an eDiscovery hold or retention policy before you can delete it.
Deleting a OneDrive for work and school site
Similarly, you may determine to delete a user's OneDrive for work and school site in response to a DSR deletion request. If you delete the user's Office 365 account, their OneDrive for work and school site is retained (and restorable) for 30 days. After 30 days, it's moved to the SharePoint Recycle Bin (soft-deleted), and then after 93 days, it's permanently deleted (hard-deleted). To accelerate this process, you can use the Remove-SPOSite cmdlet to move the OneDrive for work and school site to the Recycle Bin and then use the Remove-SPODeletedSite cmdlet to permanently delete it. As with sites in SharePoint, you can't delete a user's OneDrive for work and school site if it was assigned to an eDiscovery hold or a retention policy before the user's account was deleted.
Deleting OneDrive for work and school and SharePoint Experience Settings
In addition to user-created files stored in OneDrive for work and school accounts and SharePoint sites, these services store information about the user that is used to enable various experiences. These were previously documented in this document. See the Additional considerations for selected applications section under Using the Content Search eDiscovery tool to respond to DSRs for information about how to access, view, and export OneDrive for work and school and SharePoint application data.
Deleting a SharePoint user profile
The SharePoint user profile will be permanently deleted 30 days after the user account is deleted in Microsoft Entra ID. However, you can hard-delete the user account, which will remove the SharePoint user profile. For more information, see the Deleting a user section in this guide.
An admin can expedite the deletion of the User Profile for a user by using the Remove-SPOUserProfile cmdlet in SharePoint PowerShell. See Remove-SPOUserProfile. This requires the user to be at least soft-deleted in Microsoft Entra ID.
Deleting User Information lists on SharePoint sites
For users that have left the organization, this data remains in the sites they interacted with for referential integrity of SharePoint column fields. An admin can delete all User information properties for a user on a given site by using the Remove-SPOUserInfo command in SharePoint PowerShell. See Remove-SPOUserInfo for information about running this PowerShell cmdlet.
By default, this command retains the display name of the user and deleted properties such as telephone number, email address, skills and expertise, or other properties that were copied from the SharePoint user profile. An admin can use the RedactUser parameter to specify an alternate display name for the user in the User Information list. This affects several parts of the user experience and will result in information loss when looking at the history of files in the site.
Finally, the redaction capability won't remove all metadata or content referencing a user from documents. The way to achieve redaction of file content and metadata is described in the Making changes to content in OneDrive for work and school and SharePoint section in this guide. This method consists of downloading, deleting, and then uploading a redacted copy of the file.
Deleting OneDrive for work and school experience settings
The recommended way to delete all OneDrive for work and school experience settings and information is to remove the user's OneDrive for work and school site, after reassigning any retained files to other users. An admin can delete these lists using PowerShell Script and SharePoint Client-Side Object Model (CSOM) commands. See Deleting OneDrive for work and school experience settings for more information about the settings, how they're stored, and how to delete them.
OneDrive for work and school and SharePoint search queries
A user's search queries created in the OneDrive for work and school and SharePoint search experience are automatically deleted 30 days after the user creates the query.
Deleting items in Exchange Online mailboxes
You may have to delete items in Exchange Online mailboxes to satisfy a DSR delete request. There are two ways that an IT admin can delete items in mailbox, depending on whether to soft-delete or hard-delete the target items. Like documents on SharePoint or OneDrive for work and school sites, items in a mailbox that is on hold can't be permanently deleted from Office 365. The hold must be removed before the item can be deleted. Again, you'll have to determine whether the hold on the mailbox or the DSR delete request takes precedence.
Soft-delete mailbox items
You can use the Content Search Action functionality to soft-delete items that are returned by a Content Search. As previously explained, soft-deleted items are moved to the Recoverable Items folder in the mailbox while hard-deleted items are permanently deleted and can't be recovered.
Here's a quick overview of this process:
- Create and run a Content Search to find the items that you want to delete from the user mailbox. You may have to rerun the search to narrow that search results so that only the items that you want to delete are returned in the search results.
- Use the New-ComplianceSearchAction -Purge PurgeType SoftDelete or New-ComplianceSearchAction -Purge PurgeType HardDelete command in Office 365 PowerShell to delete items that are returned by the Content Search that was created in the previous step.
For detailed instructions, see Search for and delete email messages in your organization.
Hard-delete items in a mailbox on hold
As previously explained, if you hard-delete items in a mailbox on hold, items aren't removed from the mailbox. They're moved to a hidden folder in the Recoverable Items folder (the Purges folder) and will remain there until the hold duration for the item expires or until the hold is removed from the mailbox. If either of those things happen, the items will be purged from Office 365 the next time that the mailbox is processed.
Your organization might determine that items being permanently deleted when the hold duration expires meets the requirements for a DSR deletion request. However, if you determine that mailbox items must be immediately purged from Office 365, you would have to remove the hold from the mailbox and then hard-deleted the items from the mailbox. For detailed instructions, see Delete items in the Recoverable Items folder of cloud-based mailboxes on hold.
Note
To hard-delete mailbox items to satisfy a DSR deletion request by following the procedure in the previous topic, you may have to soft-delete those items while the mailbox is still on hold so that they are moved to the Recoverable Items folder.
Deleting a user
In addition to deleting personal data in response to a DSR deletion request, a data subject's "right to be forgotten" may also be fulfilled by deleting their user account. Here are some reasons that you might want to delete a user:
- The data subject has left (or is in the process of leaving) your organization.
- The data subject has requested that you delete system-generated logs that have been collected about them. Examples of data in system-generated logs include Office 365 app and service usage data, information about search requests performed by the data subject, and data generated by product and services as a product of system functionality and interaction by users or other systems. For more information, see Part 3: Responding to DSRs for system-generated Logs in this guide.
- Permanently prevent the data subject from accessing or processing data in Office 365 (as opposed to temporarily restriction access by the methods described in the section Responding to DSR restriction requests.
After you delete a user account:
- The user can no longer sign-in to Office 365 or access any of your organization's Microsoft resources, such as their OneDrive for work and school account, SharePoint sites, or their Exchange Online mailbox.
- Personal data, such as email address, alias, phone number, and mailing address, that's associated with the user account is deleted
- Some Office 365 apps remove information about the user. For example, in Microsoft Flow, the deleted user is removed from the list of owners for a shared flow.
- System-generated logs about the data subject, with the exception of data that may compromise the security or stability of the service, will be deleted 30 days after the user account is deleted. For more information, see the section Deleting system-generated logs.
Important
After you delete a user account, that person will lose the ability to sign in to Office 365 and the ability to sign in to any products or services for which he or she formerly relied upon for a work or school account. That person would also be unable to initiate any DSR requests through Microsoft directly in instances where Microsoft is the data controller. For more information, see the Product and services authenticated with an Org ID for which Microsoft is a data controller section in Part 4 of this guide.
Note
In the event that you are a customer currently engaged in FastTrack migrations, deleting the user account will not delete the data copy held by the Microsoft FastTrack team, which is held for the sole purpose of completing the migration. If, during the migration, you would like the Microsoft FastTrack team to also delete the data copy, you can submit a request. In the ordinary course of business, Microsoft FastTrack will delete all data copies once the migration is complete.
Like the soft-deletion and hard-deletion of data that was described in the previous section on deleting personal data, when you delete a user account, there's also a soft-deleted and hard-deleted state.
- When you initially delete a user account (by deleting the user in the admin center or in the Azure portal), the user account is soft-deleted, and moved the Recycle Bin in Azure for up to 30 days. At this point, the user account can be restored.
- If you permanently deleted the user account, the user account is hard-deleted and removed from the Recycle Bin in Azure. At this point, the user account can't be restored, and any data associated with the user account will be permanently removed from the Microsoft cloud. Hard-deleting an account deletes system-generated logs about the data subject, except for data that may compromise the security or stability of the service.
Here's the high-level process for deleting a user from your organization.
Go to the admin center or the Azure portal and locate the user.
Delete the user. When you initially delete the user, the user's account is sent to the Recycle Bin. At this point, the user is soft-deleted. The account is retained in the soft-deleted for 30 days, which allows you to restore the account. After 30 days, the account is automatically hard-deleted. For specific instructions, see Delete users from Microsoft Entra ID.
You can also soft-delete a user account in the admin center. See Delete a user from your organization.If you don't want to wait for 30-days for the user account to be hard-deleted, you can manually hard-delete it. To do this in the Azure portal, go to the Recently deleted users list and permanently delete the user. At this point, the user is hard-deleted. For instructions, see How to permanently delete a recently deleted user.
You can't hard-delete a user in the Office 365 admin portal.
Note
In Office 365 operated by 21Vianet (China), you can't permanently delete a user as previously described. To permanently delete a user, you can submit a request via the Office 365 admin portal at this URL. Go to Commerce and then select Subscription -> Privacy -> GDPR and enter the required information.
Removing Exchange Online data
One thing to understand when deleting a user is what happens to the user's Exchange Online mailbox. After the user account is hard-deleted (in step 3 in the previous process) the deleted user's mailbox isn't automatically purged from Office 365. It takes up to 60 days after the user account is hard-deleted to permanently remove it from Office 365. Here's the mailbox lifecycle after the user account is deleted and a description of the state of the mailbox data during that time:
- Day 1-Day 30 — The mailbox can be fully restored by restoring the soft-deleted user account.
- Day 31-Day 60 — For 30 days after the user account is hard-deleted, an admin in your organization can recover the data in the mailbox and import it into a different mailbox. This provides organizations the ability to recover the mailbox data if necessary.
- Day 61-Day 90 - An admin can no longer recover the data in the mailbox. The mailbox data will be marked for permanent removal, and it takes up to 30 more days for the mailbox data to be purged from Office 365.
If you determine that this mailbox lifecycle doesn't meet your organization's requirements for responding to a DSR deletion request, you can contact Microsoft Support after you hard-delete the user account, and request Microsoft to manually initiate the process to permanently remove the mailbox data. This process to permanently remove mailbox data starts automatically after day 61 in the lifecycle, so there would be no reason to contact Microsoft after this point in the lifecycle.
Using In-App functionality to respond to DSRs
While most Customer Data is authored and produced using the applications described in the previous section, Office 365 also offers many other applications that customers can use to produce and store Customer Data. However, Content Search doesn't currently have the ability to find data authored in these other Office 365 applications. To find data generated by these applications, you or the data owner must use in-product functionality or features to find data that may be relevant to a DSR. The following list identifies these Office 365 applications.
Applications where in-app functionality can be used to find Customer Data:
- Access
- Business App for Office 365
- Education
- Flow
- Forms
- Planner
- Power Apps
- Power BI
- Project
- Publisher
- Stream
- Viva Engage
- Viva Pulse
Access
The following sections explain how to use the in-app functionality in Microsoft Access to find, access, export, and delete personal data.
Discover
There are several ways that you can search for records in an Access database that might be responsive to a DSR request. For a DSR investigation, you can search for records that related to the data subject or search for records that contain specific data. For example, you could either search or go to a record that corresponds to the data subject. Or you can search for records that contain specific data, such as personal data about the data subject. For more information, see:
Access
After you find the records or fields that are relevant to the DSR request, you can take a screenshot of the data or export it to an Excel file, Word file, or a text file. You can also create and print a report based on a record source, or a select query that you created to find the data. See:
- Introduction to reports in Access
- Export data to Excel
- Export data to a Word document
- Export data to a text file
Export
As previously explained, you can export data from an Access database to different file formats. The export file format that you choose might be determined by the specific DSR export request from a data subject. See Import and export for a list of articles that describe how to export Access data in different file formats.
Delete
You can delete an entire record or just a field from an Access database. The quickest way to delete a record from an Access database is to open the table in Datasheet view, select the record (row) or just the data in a field that you want to delete, and then press Delete. You can also use a select query that you created to find data and then convert it to a delete query. See:
Business Apps for Office 365
This section explains how to use the in-app functionality in each of the following Business Apps for Office 365 to respond to DSR requests.
Bookings
The following sections explain how to use the in-app functionality in Microsoft Bookings to find, access, export, and delete personal data. This applies to both the standalone Bookings app and to Bookings when accessed through the Business center.
Microsoft Bookings allows administrators and users or staff, with a Bookings license in their organization, to set up booking pages so customers can schedule and make changes to appointments, receive confirmation emails, updates, cancellation, and reminders email. Business owners and their staff can also book events on behalf of their customers with Bookings.
The following types of data are created by customers, administrators, or staff:
Contact information of customers, partners, and friends - This data contains name, phone number, email address, address, and notes.
Contacts for anyone can be manually created by using the Bookings Web, iOS, and Android clients.
Contacts for anyone can be imported from a C1's mobile device into Bookings with the Bookings iOS and Android clients.
Contacts are also auto-created at the time of booking creation through the booking workflow for anyone booked, whether the booking is created by a user on a customer's behalf or if it's created by the customer using the owner's booking page.
Booking events - These are meetings between the business owner or their designated staff and a customer, which are created either by the business owner or the customer through the business owner's public booking page. This data includes name, address, email address, phone number, and any other info the business owner collects from the customer at the time of booking.
Email confirmations/cancellations/updates - These are email messages generated and sent by the system in association with specific booking events. They contain personal data about the staff who is scheduled to deliver the relevant service and they contain personal data about the customer that was entered by either the business owner or the customer at the time of booking.
All customer content is stored in the Exchange Online mailbox that hosts the organization's Bookings. This content is retained for as long as the business owner and customer are active in the service, unless they explicitly request that the data be deleted or if they leave the service. This content can be deleted with in-product UI, with a cmdlet, or through deletion of the relevant booking mailbox. Once the deleted action is initiated, the data is deleted within the time period set by the business owner.
If a customer decides to leave the service, their customer contents is deleted after 90 days. For more information about when mailbox content is deleted after a user account in deleted, see Removing Exchange Online data.
End User Identifiable Information
End user Identifiable Information (EUII) includes personal and contact information about the staff that gets scheduled in Bookings. It's added to the Staff details pages when the business owner sets up Bookings and makes updates after the setup. It contains staff member's name, initials, email address, and phone number. This data is stored in the Exchange Online mailbox that hosts Bookings.
This data is retained for as long as the staff member is active in the service unless it's explicitly deleted the business owner or an admin using the in-app UI or by deleting the relevant booking mailbox. When the admin initiates the deletion of staff's details, or if the staff member leaves the service, their details are deleted in accordance with the Exchange Online mailbox's content retention policies set by the business owner or admin.
Discover/Access
Bookings gather and store the following types of data:
- Business profile information: Customer content about the business using Bookings is collected through the Bookings' Business information form and is synchronized with the Business Center Business Profile if a customer is using Bookings along with the Business center. The only EUII associated with this data is an email address of the C1. This address is where new booking notifications and update emails are sent.
- Customer contacts: Contacts can be manually created in the Bookings Web, iOS, and Android clients, or they can be imported from a mobile device. Contacts are also automatically created during the use of the self-service booking page. They contain EUII and are stored in the Bookings mailbox.
- Staff details: Customer content includes data about the staff that are eligible to deliver the services created from either the Bookings Web, iOS, or Android clients. Staff details can contain name, email address, and phone number.
- Booking events: These are customer meetings and related customer content created by the business using a Web client or Android/iOS app, or created by the customer using a public booking page (or a Facebook page). These events can include name, address, email address, phone number, and appointment details.
- Meeting requests, email confirmations/cancellations/updates, and email reminders: These are email messages sent by the system in association with bookings. They contain staff data and customer data that was entered at time of booking.
Export
To export data corresponding to the business owner, staff and customers, you can use the Business center privacy portal.
Delete
You can delete the following types of Bookings data in response to a DSR deleting request:
- Business profile information and contacts: You can delete the Bookings mailbox in the admin center. After you delete the mailbox, you can restore it with 30 days. After 30 days, the account and the corresponding mailbox are permanently deleted. For details about deleting a user account, see the section Deleting a user.
- Staff details: You can delete staff from the Bookings dashboard. To permanently detail staff, you can delete their Office 365 account.
- Bookings events: You can delete bookings events from the Bookings calendar, which will remove the customer's information.
- Meeting requests, email confirmations/cancellations/updates, and email reminders: You can delete these from the Bookings calendar, which will remove the customer's information.
To export data corresponding to the business owner, staff and customers, you can use the Business center privacy portal.
Additionally, you can delete business owner and staff data, you can delete the corresponding user account. See the section Deleting a user.
Listings
The following sections explain how to use the in-app functionality in Microsoft Listings to find, access, export, and delete personal data.
Discover
Listings owner can connect their business to Google, Bing, Yelp, and Facebook to see an aggregated view of ratings and reviews. Listings collect and store the following types of data:
- Google reviews and ratings
- Bing reviews and ratings
- Yelp reviews and ratings
- Facebook reviews and ratings
Access
Listings owner can sign in to the Listings dashboard to see their reviews and ratings.
Export
To export data corresponding to the business owner, staff and customers, you can use the Business center privacy portal.
Delete
If a Listings owner would like to delete their Listings information, they can disconnect from the provider on the Listings page. After they disconnect, their Listings information will be deleted.
Connections
The following sections explain how to use the in-app functionality in Microsoft Connections to find, access, export, and delete personal data.
Discover
Connections collect and store the following types of data:
- Customers/contacts are created by the business using the web client or mobile app (iOS, Android), or by using the app when a business contact is sent an email marketing campaign. Customer data can include name, address, email address, and tax ID numbers. Contacts are shared across all Business center apps.
- Customers can sign up on the Connections sign-up page and save their personal information.
- Links from email campaigns
Access
A Connections owner can sign in to the Connections dashboard and see the email campaigns they've sent.
Export
To export data corresponding to the business owner, staff and customers, you can use the Business center privacy portal.
Delete
After a Connections owner sends an email campaign, they can't delete the campaign. If there are any draft campaigns they want to delete, they can sign in to the Connections dashboard and delete the draft campaigns.
Education
This section explains how to use the in-app functionality of the following Microsoft Education apps to respond to DSR requests.
- Assignments
- Class Notebook
Assignments
The following sections explain how to use the in-app functionality in Assignments to find, access, export, and delete personal data.
Discover/Access
Assignments stores information that is generated both by teachers and students. Some of this information is store in SharePoint and some is stored in a non-SharePoint location.
Finding Assignments data stored in SharePoint
Students files associated with a Submission for Assignment are stored in a document library (named Student Work) and files associated with Assignments that are created by teachers and (accessible by students) are stored in a different document library (named Class Files). Both document libraries are in the corresponding Class Team SharePoint site.
An admin can use the Content Search tool in the Microsoft Purview compliance portal to search for student files (in the Student Work and Class Files libraries) that are related to submissions on assignments and files related to assignments. For example, an admin could search all SharePoint sites in the organization and use the student's name and class or assignment name in the search query to find data relevant to a DSR request.
Similarly, an admin can search for teacher files related to assignments for files that a teacher distributed to students. For example, an admin could search all SharePoint sites in the organization and use the teacher's name and class or assignment name in the search query to find data relevant to a DSR request.
For more information, see:
- Assignments Admin Documentation
- Using the Content Search eDiscovery tool to respond to DSRs (in this guide)
Finding Assignments data not stored in SharePoint
The following types of Assignments data aren't stored in the class team SharePoint site, and therefore aren't discoverable by using Content Search. This data this includes the following:
- Student grades and feedback from the teacher
- The list of documents submitted for an assignment by each student
- Assignment details, like the date the assignment is due
To find data, an admin or a teacher would have to go into the Assignment in the Class Team site to find data that may be relevant to a DSR request. An admin can add themselves as an owner to the class and view all the assignments for that class team.
Even if a student is no longer part of a class, their data might still be present in the class and marked as "no longer enrolled". In this case, a student submitting a DSR request would have to provide the admin the list of classes that they were formally enrolled it.
Export
You can export Assignments data for a specific student for all classes in which the student is enrolled by using a PowerShell script to get a list of classes for the student and then using a PowerShell script to export the data. See:
- Configure Assignments for Teams
- Get a list of classes for a specific student
- Export student and teacher data from Assignments
If the student has been removed from the Team Class site, the admin can add the student back to the site before running the export script. Or the admin can use the input file for the script to identify every class that the student was ever enrolled in. You can also use the Assignment export script to export submissions data for all assignments that a teacher has access to.
Delete
You can delete Assignments data for a specific student for all classes in which the student is enrolled by using a PowerShell script to get a list of classes for the student and then using a PowerShell script to delete the data. You should do this before you remove the student from the class. See:
- Configure Assignments for Teams
- Get a list of classes for a specific student
- Delete student data from Assignments
If the student has been removed from the Team Class site, the admin can add the student back to the site before running the export script. Or the admin can use the input file for the script to identify every class that the student was ever enrolled in. You can't use the Assignments deletion script to delete teacher data because all Assignments are shared across the Class Team site. As an alternative, an admin would have to add themselves to the Class Team site and then delete a specific Assignment.
Class Notebook
Searching for content in Class Notebook is discussed previously in this guide. See the OneNote Class Notebook section. You can also use the Content Search tool to export data from a Class Notebook. Alternatively, an admin or the data subject can export data from a Class Notebook. See Save a copy of a Class Notebook.
Flow
The following sections explain how to use the in-app functionality in Microsoft Flow to find, access, export, and delete personal data.
Discover
People can use Flow to perform data-related tasks such as synchronizing files between applications, copying files from one Office 365 service to another, and collecting data from one Office 365 app and storing it in another. For example, a user could set up a Flow to save Outlook email attachments to their OneDrive for work and school account. In this example, you could use the Content Search tool to search the user's mailbox for the email message that contained the attachment or search their OneDrive for work and school account for the file. This is an example where data handled by Flow might be discoverable in the Office 365 services connected by a Flow workflow.
Additionally, people can use Flow to copy or upload files from Office 365 to an external service, such as Dropbox. In these cases, a DSR request concerning the data in an external service would have to be submitted to the external service, who is processing the data in this type of scenario.
If an admin receives a DSR request, they can add themselves as an owner of a user's flows. This enables an admin to perform functions including exporting flow definitions, running histories, and performing flow permission reassignments. See Manage Flows in the Admin Center.
An admin's ability to add themselves as an owner of a Flow requires an account with the following permissions:
Flow/PowerApps Plan 2 license (paid or trial)
-
or
Having these privileges enables the admin to use the Flow admin center to access all Flows in the organization.
To add yourself as an owner of a flow.
- Go to https://admin.flow.microsoft.com
- Sign in with your Office 365 credentials.
- On the Environments page, select the environment for the flows that you want to access. organizations have a default environment.
- On the page for the environment that you selected, select Resources, and then select Flows. A list of all flows in the environment is displayed.
- select View details for the flow that you want to add yourself as a member.
- Under Owners, select Manage sharing.
- On the Share flyout, add yourself as a member and then save the change.
After you make yourself an owner, go to Flow > My flows > Team flows to access the flow. From there, you can download the run history or export the flow. See:
Access
A user can access the definitions and run histories of their flows.
- Flow definitions: A user can export the definition of a flow (which is exported as a Flow package, formatted as JSON in a zipped file). See Export and import your flows across environments with packaging.
- Flow run histories: A user can download the run history of each of their flows. A flow run history is downloaded as a CSV file, which can be opened in Excel to filter or search. Users can also download the run history of multiple flows. See Download flow run history.
Delete
An admin can add themselves as an owner of a user's flows in the Flow admin center. If a user leaves your organization and their Office 365 account is deleted, the flows that they're the sole owner of will be retained. This is to help your organization transition the flows to new owners and avoid any disruption to your business for flows that may be used for shared business processes. An admin then needs to determine whether to delete the flows that were owned by the user or reassign to new owners, and take that action.
For shared flows, when a user is deleted from your organization, their name is removed from the list of owners.
Export
An admin can export the definition and run history of a user's flows. To do this, an admin must add themselves as an owner of the user's flow in the Flow admin center
Flow definitions: After an admin adds themselves as an owner of a flow, they can go to Flow > My Flows > Teams flows to export the flow definition (which is exported as a Flow package, formatted as JSON in a zipped file). See Export and import your flows across environments with packaging.
Flow run histories: Similarly, an admin must add themselves as an owner of a Flow to export its flow run history. The Flow run history is downloaded as a CSV file, which means you can use Excel to filter or search. You can also download the run history of multiple Flows, as long as you have ownership. See Download flow run history.
Connections and custom connectors in Flow
Connections require users to provide credentials to connect to APIs, SaaS applications, and custom developed systems. These connections are owned by the user that established the connection and can be managed in-product. After Flows have been reassigned, an admin can use PowerShell cmdlets to list and delete these connections as part of deleting user data.
Custom connectors allow organizations to extend the capabilities of Flow by connecting to systems where an out-of-box connector isn't available. A custom connector author can share their connector with others in an organization. After receiving a DSR deleting request, an admin should consider reassigning ownership of these connectors to avoid business disruption. To expedite this process, an admin can use PowerShell cmdlets to list, reassign, or delete custom connectors.
Forms
The following sections explain how to use the in-app functionality in Microsoft Forms to find, access, export, and delete personal data.
Discover
Forms users can go to https://forms.office.com and select My forms to see the Forms they've created. They can also select Shared with me to view Forms others have shared via a link. If there are many Forms to sort through, users can use the in-product search bar to search for Forms by title or author. To determine whether Microsoft Forms is a place where personal data responsive to your DSR is likely to reside, you can ask the Data Subject to search his or her Shared with me list to determine which users ("Forms owners") have sent Forms to the Data Subject. You can then ask the forms owners to select Collaborate or Duplicate in the top navigation bar and send you a link to a specific form so you can view it and further determine whether it's material to your DSR.
Access
After the relevant Forms are found, you can access the responses to the Form by clicking the Responses tab. Learn more about how to check your quiz results or form results. To review response results in Excel, select the Responses tab, and then select Open in Excel. If you would like to send the Data Subject a copy of the Form, you can either take screenshots of the relevant questions and answers that are in shown in the application in rich text format or send the Data Subject an Excel copy of the results. If you're using Excel and would like to share with the Data Subject only portions of the survey result, you can delete certain rows or columns or redact the remaining sections before sharing the results. Alternatively, you can go to Collaborate or Duplicate > Get a link to duplicate (under Share as a template) to provide the Data Subject with a replicate of the entire Form.
Delete
Any survey, quiz, questionnaire, or poll can be permanently deleted by its owner. If you would like to honor a DSR "forget me" and delete a form in its entirety, find the Form in the list of forms, select the series of dots (ellipsis) in the upper right corner of the form preview window, and then select Delete. Once a Form is deleted, it can't be retrieved. For information, see Delete a Form.
Export
To export form questions and responses to an Excel file, open the form, select the Responses tab, and then select Open in Excel.
Planner
The following sections explain how to use the in-app functionality in Microsoft Planner to find, access, export, and delete personal data. Planner data includes core task, plan, and bucket data, like titles, descriptions, dates, and so on. Comments on a task are conversations stored in Exchange. Uploaded attachments are stored in SharePoint. Please refer to those workloads for info on discovering or exporting comments or attachments.
Discover
Planner users can go to the Planner site to view their plans and tasks assigned to them. When an admin searches for content on behalf of a user, they can use the process described in the "Export" section to find content related to the user.
Access
The same process to discover data also provides access to the data, either through the Planner site or the export process.
Delete
You can manually delete a user's personally information by either giving yourself permissions to access the plans the user is part of or signing in as the user to make the changes. See Delete user data in Microsoft Planner.
Export
You can use a PowerShell script to export a user's data from Planner. When you export the data, a separate JSON file is export for each plan that the user is a part of. See Export user data from Microsoft Planner.
Power BI
The following sections explain how to use the in-app functionality in Microsoft Power BI to find, access, export, and delete personal data.
Discover
You can search for content in the different workspaces in Power BI, including dashboards, reports, workbooks, and datasets. Each type of workspace contains a search field that you can use to search that workspace. See Searching, finding, and sorting content in Power BI service.
Access
You can print dashboards, reports, and visuals from reports in Power BI to produce a physical copy. You can't print entire reports; you can only print one page at a time. To do this, go to a report, use the search field to find specific data, and then print that page. See Printing from Power BI service.
Delete
To delete dashboards, reports, and workbooks, see Delete almost anything in Power BI service.
Deleting a dashboard, report, or workbook doesn't delete the underlying dataset. Because Power BI relies on a live connection to the underlying source data to be complete and accurate, deleting personal data must be done there. (For example, if you created a Power BI report that is connected to Dynamics 365 for Sales as the live data source, you would have to make any corrections to the data in Dynamics 365 for Sales.)
After the data is deleted, you can use the scheduled data refresh capabilities in Power BI to update the dataset that is stored in Power BI, after which the deleted data will no longer be reflected in any Power BI reports or dashboards that used that data. To help comply with GDPR requirements, you should have policies in place to ensure that you're refreshing your data at an appropriate cadence.
Export
To facilitate a data portability request, you can export dashboards and reports in Power BI:
- You can export the underlying data for dashboards and reports to a static Excel file. See the video in Printing from Power BI service. Using Excel, you can then edit the personal data to be included in the portability request, and save it in a commonly used, machine-readable format such as .csv or .xml.
- You can export (download) a report from the Power BI service in Office 365 to a .pbix file if it was originally published using Power BI Desktop. You can then import this file to Power BI Desktop and publish (export) it to the Power BI service of another organization. See Export a report from Power BI service to Desktop.
PowerApps
The following sections explain how to use the in-app functionality in Microsoft Power Apps to find, access, export, and delete personal data. These steps outline how an admin can transition apps and their dependent resources to new owners to limit business disruption.
Discover
PowerApps is a service for building apps that can be shared and used within your organization. As a part of the process of building or running an app, a user ends up storing several types of resources and data in the PowerApps service, including apps, environments, connections, custom connectors, and permissions.
To help facilitate a DSR request related to PowerApps, you can use the administration operations exposed in the PowerApps Admin Center and PowerApps Admin PowerShell cmdlets. Access to these tools requires an account with the following permissions:
- A paid PowerApps Plan 2 license or a PowerApps Plan 2 trial license. You can sign up for a 30-day trial license here.
- Global administrator or
- Microsoft Entra Global Administrator
For more information about finding personal data, see Discover PowerApps personal data.
The PowerApps service also includes the Common Data Service For Apps, which enables users to store data in standard and custom entities within a Common Data Service database. You can view the data stored in these entities from the PowerApps Maker portal, and use the in-product search capabilities of Advanced Find to search for specific data in the entity. For more information around discovering personal data in the Common Data Service, see Discover Common Data Service personal data.
Access
Admins have the ability to assign themselves privileges to access and run the apps and associated resources (including flows, connections, and custom connectors) using the PowerApps Admin Center or PowerApps Admin PowerShell cmdlets.
After you have access to the user's app, you can use a web browser to open the app. After you open an app, you can take a screenshot of the data. See Use PowerApps in a web browser.
Delete
Because PowerApps allow users to build line-of-business application that can be a critical part of your organization's day-to-day operations, when a user leaves your organization and their Office 365 account is deleted, the admin needs to determine whether to delete the apps owned by the user or reassign to new owners. This is to help your organization transition apps to new owners and avoid any disruption to your business for apps that may be used for shared business processes.
For shared data, like apps, admins must decide whether to permanently delete that user's shared data or keep them by reassigning the data to themselves or someone else within their organization. See Delete PowerApps personal data.
Any data that was stored by a user in an entity in a Common Data Service For Apps database will also need to be reviewed and (if desired) deleted by an admin using the in-product capabilities. See Delete Common Data Service user personal data.
Export
Admins have the ability to export personal data stored for a user within the PowerApps service using the PowerApps Admin Center and PowerApps Admin PowerShell cmdlets. See Export PowerApps personal data.
You can also use the in-product search capabilities of Advanced Find to search for a user's personal data in any entity. For details about exporting personal data in the Common Data Service, see Export Common Data Service personal data.
Connections and custom connectors in PowerApps
Connections require users to provide credentials to connect to APIs, SaaS applications, and custom developed systems. These connections are owned by the user that established the connection and can be managed in-product. After PowerApps have been reassigned, an admin can use PowerShell cmdlets to list and delete these connections as part of deleting user data.
Custom connectors allow organizations to extend the capabilities of PowerApps by connecting to systems where an out-of-box connector isn't available. A custom connector author can share their connector with others in an organization. After receiving a DSR deleting request, an admin should consider reassigning ownership of these connectors to avoid business disruption. To expedite this process, an admin can use PowerShell cmdlets to list, reassign, or delete custom connectors.
Project Online
The following sections explain how to use the in-app functionality in Microsoft Project Online to find, access, export, and delete personal data.
Discover and access
You can use Content Search to search the SharePoint site that's associated with a Project (when a Project is first created, there's an option to create an associated SharePoint site); Content Search doesn't search the data in an actual project in Project Online, only the associated site. Though Content Search searches for metadata about projects such as people mentioned in the subject) However, this may help you find (and access) the Project that contains the data related to the DSR.
Tip
The URL for the site collection in your organization where sites associated with Projects is https://<your org>.sharepoint.com/sites/pwa; for example, https://contoso.sharepoint.com/pwa. You can use this specific site collection as the location of your content search and then the name of the Project in the search query. Additionally, an IT admin can use the Site Collections page in the SharePoint admin center to get a list of PWA site collections in the organization.
Delete
You can delete information about a user from your Project Online environment. See Delete user data from Project Online.
Export
You can a specific user's content from your Project Online environment. This data is exported to multiple files in the JSON format. For step-by instructions see, Export user data from Project Online. For detailed information about the files that are exported, see Project Online export json object definitions.
Publisher
The following sections explain how to use the in-app functionality in Microsoft Publisher to find, access, export, and delete personal data.
Discover
You can use the in-app search feature to find text in a Publisher file the same way as you can in most Office applications. See Find and replace text.
Access
After you find data, you can take a screenshot of it or copy and paste it into a Word or text file and provide that to the data subject. You can also save a publication as a Word, PDF, or XPS file. See:
- Save a publication as a Word document
- Save As or convert a publication to .pdf or .xps using Publisher
Export
You can provide a data subject with the actual Publisher file or as previously explained, you can save a publication as a Word, PDF, or XPS file. See:
- Save a publication as a Word document
- Save As or convert a publication to .pdf or .xps using Publisher
Delete
You can delete content from a publication, delete entire pages, or delete an entire Publisher file. See Add or delete pages.
Stream
The following sections explain how to use the in-app functionality in Microsoft Stream to find, access, export, and delete personal data.
Discover
To discover content that is generated or uploaded to Stream that may be relevant to a data subject request, a Stream admin can run a user report to determine what videos, video descriptions, groups, channels, or comments a Stream user may have uploaded, created, or posted by a user. For instructions on how to generate a report, see Managing user data in Microsoft Stream. The report output is in HTML format and contains hyperlinks that can be used to navigate to videos of potential interest. If you would like to view a video that has custom permission set and you aren't part of the original users for whom the video was intended, you can view in admin mode, See Admin capabilities in Microsoft Stream.
Access
Depending on the nature of the data subject request, a copy of the report described above can be used help satisfy a data subject request. The user report includes the Stream user's name and unique ID, a list of videos the user uploaded, a list of videos the user has access to, a list of channels the user created, a list of all the groups the user is a member of, and a list of all comments the user left on videos. The report further shows whether the user viewed each video listed in the user report. If you would like to provide the data subject with access to a video to satisfy a DSR request, you can share the video.
Export
See the Access section for Stream.
Delete
To delete or edit videos or any other Stream content, a Stream admin can select view in admin mode to perform the necessary function. See Admin capabilities in Microsoft Stream. If a user has left the organization and would like to have their name removed from appearing next to videos that they uploaded, you can remove their name or replace it with another. See Managing deleted users in Microsoft Stream.
Sway
The following sections explain how to use the in-app functionality in Microsoft Sway to find, access, export, and delete personal data.
Discover
Content created using Sway (found at www.sway.com) can only be seen by the owner and those that the author has permitted to view the Sway. See Privacy Settings in Sway. To determine whether Sway is a place where personal data responsive to your DSR is likely to reside, you can ask the Data Subject and organizational users who are likely to have generated content about the Data Subject to search their Sways and share with you any Sways that are likely to contain personal data responsive to the Data Subject's request. For information on how to share a Sway, see "Share a Sway from your Organizational Account" in this Share your Sway article.
Access
If you have found personal data in a Sway that you would like to share with the Data Subject, you can provide the Data Subject with access to the data through one of several means. You can provide the Data Subject a copy of the online version of Sway (as described above); you can take screenshots of the relevant portion of the Sway that you would like to share; or you can print or download the Sway to Word or convert it to a PDF. How to download a Sway is further described in the "export" section below.
Delete
To learn how to delete a Sway, go to the "How do I delete my Sway?" section in Privacy settings in Sway.
Export
To export a Sway, open the Sway that you would like to download, select the series of dots (ellipsis) in the upper right corner, select Export, and then choose either Word or PDF.
Whiteboard
The following sections explain how to use the in-app functionality in Microsoft Whiteboard to find, access, export, and delete personal data.
Whiteboard 2016 on Surface Hub
This section describes responding to DSR requests for data created using the built-in Whiteboard 2016 app on Surface Hub.
Discover
Whiteboard files (.wbx files) are stored in users' OneDrive for work and school account. You can ask the data subject or other users if whiteboards they created may contain personal data responsive to a DSR request. They can share a whiteboard with you, or you can get a copy of it to give to the data subject.
To access and transfer whiteboards:
- Give yourself access to the user's OneDrive for work and school account. See the "Get access to the former employee's OneDrive for work and school documents" section in Get access to and back up a former user's data.
- Go to the Whiteboard App Data folder in the user's OneDrive for work and school account and copy the .wbx files of the whiteboards that you want to transfer.
- Give yourself access to the data subject's OneDrive for work and school account, and then go to Whiteboard App Data folder.
- Paste the .wbx files that you copied in the previous step.
Access
If you find personal data in a whiteboard that's responsive to a DSR access request, you can provide the data subject access to a whiteboard in several ways:
- Take screenshots of the relevant portions of a whiteboard.
- Upload a copy of the .wbx file to the data subject's OneDrive for work and school account. See the previous section for steps on accessing and transferring .wbx files.
- Export a copy of whiteboard as a .png file.
Export
If you've obtained a copy of a whiteboard, you can export it.
- Launch Whiteboard on the Surface Hub.
- Tap the Share button and then select Export a copy. You can export a whiteboard to a OneNote (.one) file or to an image (.png) file.
Delete
You can give yourself access to the user's OneDrive for work and school account and then delete the whiteboards.
- Give yourself access to the data subject's OneDrive for work and school account. See the "Get access to the former employee's OneDrive for work and school documents" section in Get access to and back up a former user's data
- Go to the Whiteboard App Data folder and then delete the contents of this folder.
Whiteboard for PC, Surface Hub, and other platforms
If an admin receives a DSR request for data in the new Whiteboard app, they can use Whiteboard PowerShell to add themselves (or other users) as an owner of a user's whiteboards. This enables an admin to perform actions including accessing, exporting, and deleting whiteboards. Use either the Set-WhiteboardOwner cmdlet to add yourself or another user as the owner of a whiteboard or use the Invoke-TransferAllWhiteboards cmdlet to transfer the ownership of all whiteboards for a specific user to a new owner. For information about using these cmdlets and installing the Whiteboard PowerShell module, see Microsoft Whiteboard cmdlet reference. After you or another person has ownership of a whiteboard, see Microsoft Whiteboard cmdlet reference.
After you or another person has ownership of a whiteboard, see the Whiteboard support article for detailed guidance about accessing, exporting, and deleting whiteboards.
Viva Engage
The following sections explain how to use the in-app functionality in Microsoft Viva Engage to find, access, export, and delete personal data.
Discover
From the Viva Engage admin center, a Viva Engage verified admin (global admin or verified admin set up in Viva Engage) can export data pertaining to a given user. The export includes the messages and files posted and modified by the user, and information about articles and groups created by the user. When a user-specific data export is run, the admin will also receive an inbox message with the user's account activity data that they can provide to the user if they so choose. For detailed instructions, see Manage GDPR data subject requests in Viva Engage Enterprise.
User-specific exports are for a single network, so if the user is in an external Viva Engage network, the admin must export data for that external network, and for the home network.
To access data not included in data export, screenshots can be taken for the user's profile, settings, group memberships, bookmarked messages, followed users, and followed articles. Users or admins can collect this information. For more information, see Overview of security and compliance in Viva Engage.
Access
You can view data in the exported files, including the full text of messages and the contents of files. You can also select links in the exported files to go directly to the posted messages and files in Viva Engage, and to groups, and articles the user created, messages the user liked, messages where the user is @mentioned, polls the user has voted on, and links the user has added.
Per-user data export doesn't include:
The user's profile:
If the user has a Viva Engage identity, the user has full control of their profile. For information on how to view and modify the profile, see Change my Viva Engage profile and settings.
If the user has an Office 365 identity, the Viva Engage user profile is pulled automatically from Office 365, which gets the profile information from Microsoft Entra ID. Viva Engage users can temporarily change their profiles in Viva Engage, but these changes are overwritten when there's a change in Microsoft Entra ID, so you must view and change directory data in Microsoft Entra ID. See Manage Viva Engage users across their lifecycle from Office 365 and Add or change profile information for a user in Microsoft Entra ID.
The user's settings:
The user can view and change their own settings. For information on how to view and modify user settings, see Change my Viva Engage profile and settings. An admin can view this information and take screenshots, but can't change it. Go to Viva Engage settings > People, and then select the name of the user.
The user's group membership, bookmarked messages, followed users, and followed articles.
An admin can view this information and take screenshots, but can't change it. Go to Viva Engage settings > People, and then select the name of the user.
Export
For instructions for how to export data, see Manage GDPR data subject requests in Viva Engage. You must run a per-user export for each Viva Engage network the user is a member of.
Viva Engage has data retention settings that either soft-delete or hard-delete data when a user deletes a message or file. If this is set to soft-delete, data a user has deleted will be included in the export. If the Viva Engage data retention setting is set to hard-delete, the deleted information is no longer stored in Viva Engage, so won't be included in the export.
Delete
Viva Engage allows verified admins to execute a GDPR-compliant delete via the Viva Engage admin center if they receive a DSR. This option is called Erase User, and it suspends the user for 14 days and then removes all their personal data, excluding files and messages. If the user is a guest user, this must be done for each external network the guest is a member of.
Note
If an admin wants to remove the files and messages of a user during the 14-day window, they will have to perform a user level export to identify the files and messages, and then decide which ones to delete either by in-product deletion or by using a PowerShell script. After the 14-day window, the admin can no longer associate the user with their files or messages.
When a user is deleted with the Erase User option, notification is sent to the Viva Engage Inbox of all network admins and verified admins. The Erase User option deletes the user's Viva Engage profile, but doesn't delete their Office 365 or Microsoft Entra profile.
For detailed steps to remove a user, see Manage GDPR data subject requests in Viva Engage.
Viva Pulse
The following sections explain how to use the in-app functionality in Microsoft Viva Pulse to delete personal data. Customer Content is created and viewed via the Viva Pulse web and Teams interfaces.
Delete
As an admin, you can delete a user's past Pulse requests and responses on the user's behalf. Deletion of a user's data is a hard deletion, and no record of the user's data remains. You can only delete one user's data at a time, and there's no limit as to how many times a user's data can be deleted. To delete a user's data:
- In the Manage tab, navigate to the Delete user data tab.
- Search for the user that requested their data be deleted by using the search bar and select that user in the populated options.
- Select Delete user data.
- Select Delete user data again in the confirmation box.
- You see a status message in the deletion log that says 'Pending.' Deletions can take up to a few minutes.
- Once the deletion is successful, the status of the deletion changes to 'Deleted.'
- If the deletion was unsuccessful, then the status of the deletion changes to 'Not Deleted.' In this instance, please try the deletion again.
Organizational Data in Microsoft 365
Organizational data refers to employee data uploaded by your organization's Microsoft 365 global admin using the Organizational Data in Microsoft 365 feature.
Access and Export
An end user can access and export Organizational Data uploaded by global admin and stored in the Microsoft 365 User Profile by using the data export function in the profile card. For more information, see Export data from your profile card.
Edit
An end user can contact the organization's administrator to update their Organizational Data. For more information, see Who should I contact if I need to change my information in Microsoft 365?.
A global admin can update the values of one or more attributes in end users' Organizational Data. To update the values, upload a new .csv file through the Microsoft 365 admin center that contains updated attributes for the users you wish to impact. In that file, only include users whose Organizational Data you would like to update and be sure to include all attributes that you want to be part of their Microsoft 365 User Profile. If you include an attribute in the file but leave the value empty for a user, the current value of that attribute for the user will be deleted.
Delete
An end user can contact the organization's administrator to delete their Organizational Data. For more information, see Who should I contact if I need to change my information in Microsoft 365?.
A global admin can delete the values of one or more attributes in end users' Organizational Data. To delete the values, upload a new .csv file through the Microsoft 365 admin center for the users you wish to impact. In that file, the Microsoft_PersonEmail column must have a value, and all attributes that need to be deleted must be set to empty (for String type, set to ", and for Integer type, set to -1). Keep all other attributes unchanged.
Once new Organizational Data is uploaded for an end user, that user's previously ingested Organizational Data will be deleted within seven days.
Responding to DSR rectification requests
If a data subject has asked you to rectify the personal data that resides in your organization's data stored in Office 365, you and your organization have to determine whether it's appropriate to honor the request. If you choose to honor the request, then rectifying the data may include taking actions such as editing, redacting, or removing personal data from a document or other type or item. The most expedient way to do this is to ask the data/document owner to use the appropriate Office 365 application to make the requested change. An alternative is to have an IT admin in your organization make the change. This will probably require the IT admin (or other people in your organization with the appropriate privileges, such as a SharePoint site collection administrator) to assign to themselves or someone else working on the DSR the necessary permissions to gain access to the document or the content location where the document is located to make the change directly to the document.
Requesting that the data owner to make the approved change
The most direct way to rectify personal data is to ask the data owner to make the change. After you locate the data that is the subject of the DSR, you can provide the following information so that they can make the change.
- The location and file name (for documents and other files) of the item that needs to be changed. Locating the data in question is part of the discovery process discovery process that was previously explained.
- The approved change the data owner should make
You may want to consider implementing a confirmation process where you or another person involved in the DSR investigation verifies that the requested change has been made.
Gaining access to a SharePoint site or OneDrive for work and school account to make changes
If it's not feasible for the data owner to implement the data subject's request for rectification, an IT admin or SharePoint admin in your organization can get access to the content location and make the required changes. Or, an admin can assign you or another data privacy officer the necessary permissions.
SharePoint
To assign administrator or owner permissions to a SharePoint site so that you or someone else can access and edit that document, see
OneDrive for work and school
A global admin can access a user's OneDrive for work and school account by using the .
- Sign in to Office 365 with your global admin credentials.
- Go to the admin center.
- Go to Active users and select the user.
- Expand OneDrive for work and school Settings in the details pane, and then select Access files.
- select the URL to go to the user's OneDrive for work and school account.
Gaining access to an Exchange Online mailbox to make changes to data
A global admin can assign themselves the permissions necessary to open and edit (or delete) items in another user's mailbox, as if they were the mailbox owner. A global admin can also assign these permissions to another user. Specifically, the global admin needs to add the Read and manage permission, which is the Full Access permission in Exchange Online. For details, see:
If the user mailbox is place on a legal hold or has been assigned to a retention policy, all versions of a mailbox are retained until the retention period expires or the hold is removed from the mailbox. That means if a mailbox item is changed in response to DSR rectification request, a copy of original item (before the change was made) is retained and stored in a hidden folder in the Recoverable Items folder in the user's mailbox.
Making changes to content in OneDrive for work and school and SharePoint
Admins or data owners can make changes to SharePoint documents, lists, and pages. Keep the following things in mind when making changes to SharePoint content:
Updating a document saves a new version of the document, which will contain the revision. Older versions of the document won't be updated. That means it's possible that the data that's the subject of a DSR rectification request may persist in older versions of the article. Older versions of a article can be deleted and then permanently removed from Office 365. See the Deleting documents in SharePoint and OneDrive for work and school section in this guide.
To completely redact a SharePoint file in a way that removes all traces of a data subject from the file, including all versions of the file and all recorded activity performed by the data subject, you have to perform the following steps:
- Download a copy of the file to your local computer.
- Permanently delete the file from SharePoint, by deleting the file, and then deleting if from the first-stage and second-stage Recycle Bin. See the Deleting documents in SharePoint and OneDrive for work and school section in this guide.
- Make the revisions to the copy of the document on your local computer.
- Upload the revised file to the original SharePoint location.
Data in SharePoint lists can be edited. See Add, edit, or delete list items.
IT admins can also correct certain personal properties associated with a document:
User information from the SharePoint User Profile or Office 365 is often associated with OneDrive for work and school and SharePoint documents to represent that person. For example, a user's name in a Created By or Modified By People column for a document or list item. This user information can be rectified in several ways, depending on the source:
- Rectify user properties in their own on-premises Active Directory. For customers syncing user properties such as user Display Name, First Name, etc. from an on-premises AD, those properties should be rectified there. Appropriately mapped properties flow into Office 365, and then OneDrive for work and school and SharePoint.
- Rectify user properties in the admin center. Changes made to account information there will automatically be reflected in OneDrive for work and school and SharePoint experiences. For info, see Add or change profile information for a user in Microsoft Entra ID. For properties sourced in Office 365, no changes can be made on the SharePoint side.
- Rectify user properties in the SharePoint user profile experience of the SharePoint admin center. In the user profiles tab of the SharePoint admin center, admins can select Manage user profiles, and look up any user's properties. Then they can choose to Edit the user's properties.
- Rectify user properties in a custom source. Custom SharePoint profile properties may be syncing from a custom source via Microsoft Identity Manager (MIM) or another method.
This won't affect all experiences, which may retain the older information. For example, the user's name as text in the document.
Making changes to content in Power BI
Power BI relies on the underlying source data used in its dashboards and reports to be complete and accurate, so correcting inaccurate or incomplete source data must be done there. For example, if you created a Power BI report that is connected to Dynamics 365 for Sales as the live data source, you would have to make any corrections to the data in Dynamics 365 for Sales.
After those changes are made, you can take advantage of the scheduled data refresh capabilities to update the dataset that is stored in Power BI so that the revised data is reflected in the dependent Power BI assets. To help comply with GDPR requirements, you should have policies in place to ensure that you're refreshing your data at an appropriate cadence.
Making changes to content in Viva Engage
For messages, a user can edit a given message to rectify any inaccuracies. They can request a list of all their messages from a Viva Engage verified admin, and then select a link in the file to review each message.
For files, a user can edit a given file to rectify any inaccuracies. They can request a list of all the files they posted from a Viva Engage verified admin, and then access the files in Viva Engage. Files that are exported into the Files folder can be viewed by searching for the file by number. For example, for a file named 12345678.ppx in the export, use the Search box in Viva Engage to search for 1235678.ppx. Or, go to https://www.viva-engage.com/<network_name>/#/files/<file_number>; for example, https://www.viva-engage.com/contosomkt.onmicrosoft.com/#/files/12345678.
For data that the user can access through their profile and settings, the user can make any needed changes.
The user's profile:
- If the user has a Viva Engage identity, the user has full control of their profile. For information on how to view and modify the profile, see Change my Viva Engage profile and settings.
- If the user has an Office 365 identity, the Viva Engage user profile is pulled automatically from Office 365, which gets the profile information from Microsoft Entra ID. Viva Engage users can temporarily change their profiles in Viva Engage, but these changes are overwritten when there's a change in Microsoft Entra ID, so the best place to view and change directory data is Microsoft Entra ID. The user needs to request that Microsoft Entra ID be updated. See Manage Viva Engage users across their lifecycle from Office 365 and Add or change profile information for a user in Microsoft Entra ID.
The user's settings:
- The user can change their own settings. For information on how to view and modify user settings, see Change my Viva Engage profile and settings.
- The user's group membership, bookmarked messages, followed users, and followed articles. The user can change this information; see Tips for staying organized in Viva Engage.
Responding to DSR restriction requests
Here are the ways to restrict the processing of data in Office 365:
- Remove an Office 365 application license to prevent users from accessing data via an application
- Prevent users from accessing their OneDrive for work and school account
- Turn off an Office 365 service from processing the data
- Temporarily remove the data from SharePoint and OneDrive for work and school and retain it on-premises
- Temporarily restrict all access to a SharePoint site
- Prevent a user from signing in to Office 365
If your organization determines later that a restriction no longer applies, you can end the restriction by reversing the steps you took to restrict it; such as reassigning licenses, turning a service back on, or allowing a user to sign in to Office 365.
Removing the license for an Office 365 application
As previously explained, licenses for all Office 365 applications that are included in your organization's Microsoft 365 for business subscription are assigned to all users by default. If necessary to restrict, access to data that's subject to a DSR, an IT admin can use the Office 365 admin portal temporarily turn off a user's license for an application. If a user then tries to use that application, they'll receive an unlicensed product notification or a message saying they no longer have access. For details, see Remove licenses from users in Office 365 for business.
Notes:
To restrict a user from accessing Viva Engage, you must first enforce Office 365 identify for a Viva Engage user and then remove the user's Viva Engage license.
For scenarios that take advantage of Power BI Embedded, you can restrict access to the independent software vendor (ISV) application that the content is embedded in.
Preventing users from accessing their OneDrive for work and school account
Removing a user's SharePoint license won't prevent them from accessing their OneDrive for work and school account if it exists. You have to remove the user's permissions to their OneDrive for work and school account to. You can do this by removing the user as a site collection owner of their OneDrive for work and school account. Specifically, you have to remove the user from the Primary Site Collection Administrator and Site Collection Administrators groups in their user profile. See the "Add and remove admins on a OneDrive for work and school account" section in Manage user profiles in the SharePoint admin center.
Turning off an Office 365 Service
Another way to address a DSR request to restrict the processing of data is to turn off an Office 365 service. This impacts all users in your entire organization and prevents everyone from using the service or accessing data in the service.
The most expedient way to turn off a service is to use Office 365 PowerShell and remove the corresponding user license from all users in the organization. This will in effect restrict anyone from access data in that service. For detailed instructions, see Disable access to services with Office 365 PowerShell and follow the procedures to disable Office 365 services for users from a single licensing plan.
Note
For Viva Engage, in additional to removing the Viva Engage license from user accounts, you also must disable users' ability to sign in to Viva Engage with Viva Engage credentials (by enforcing the use of their Office 365 credentials when signing in). For detailed instructions, see Turn off Viva Engage access for Microsoft 365 users.
Temporarily removing data from SharePoint or OneDrive for work and school sites
Another way to restrict the processing of personal data is to temporarily remove it from Office 365 in response to a DSR. When your organization determines that the restriction no longer applies, you can import the data back into Office 365.
Because most Office documents are on a SharePoint or OneDrive for work and school site, here's a high-level process for removing documents from sites and then re-importing them.
Get a copy of the document that is the subject of the restriction request. You may have to request either access to the site or ask a global admin or a site collection administrator to provide you with a copy of the document.
Store the document in an on-premises location (such as a file server or a file share) or another location other than your Office 365 tenant in the Microsoft cloud.
Permanently delete (purge) the original document from Office 365. This is a 3-step process:
Delete the original copy of the document. When you delete a document from a site, it's sent to the site Recycle Bin (also called the first-stage Recycle Bin).
Go to the site Recycle Bin and delete that copy of the document. When you delete a document from the site Recycle Bin, it's sent to the site collection Recycle Bin (also called the second-stage Recycle Bin). See Delete a file, folder, or link from a SharePoint document library.
Go to the site collection Recycle Bin and delete that copy of the document, which permanently removes it from Office 365. See Delete items from the site collection recycle bin.
When the restriction no longer applies, the copy of the document that was stored on-premises can be reuploaded to the site in Office 365.
Important
The preceding procedure won't work if the document is located on a site that is on hold (with one of the retention or legal hold features in Office 365). In the case where a restriction request for a DSR takes precedence over a legal hold, the hold would have to be removed from the site before a document could be permanently deleted. Additionally, the document history for deleted documents is permanently removed.
Temporarily restricting access to SharePoint sites
A SharePoint administrator can temporarily prevent all users from accessing a SharePoint site collection by locking the site collection (by using the Set-SPOSite -LockState command in SharePoint PowerShell). This prevents users for accessing the site collection and any content or data that's located in the site. If you then determine that users should be able to access the site, the administrator can unlock the site. See Set-SPOSite for information about running this PowerShell cmdlet.
Preventing a user from signing in to Office 365
An IT admin can also prevent a user from signing into Office 365, which would prevent the user from accessing any Office 365 online service or processing any data stored in Office 365. See Block a former employee's access to Office 365 data.
Part 2: Responding to DSRs with Respect to Insights Generated by Office 365
The Microsoft suite of Office 365 services includes online services that provide insights to users and organizations that have opted to use them.
- Delve and Viva Personal Insights provide insights to individual users
- Viva Manager/Leader/Advanced Insights provides insights to organizations.
These services are described in the following sections:
Delve
In Delve, users can manage their Office 365 profile and discover people and documents that may be relevant to them. Users can only see documents that they have access to. For a series of helpful articles about Delve, see Office Delve.
Access and export
Admins can't access or export a users' Delve data. This means that users have to access and export Delve data themselves. Most of the data types can be accessed and exported directly from Delve, but some data types are only available through other services.
Data available in the Delve user interface
- Profile data: This is the profile information from your organization's Global Address List in Microsoft Entra ID, and optional information that users have chosen to add about themselves. To access or export profile data in Delve, a user can select Me > Update profile. They can either copy the content directly from the page or
- Blog data: This is blog posts published by a user. To access or export blog data, a user can select Me > All posts. They can either copy the content directly from the page or take a screenshot.
- Recent people data: These are the people in the organization that Delve has inferred are most relevant to the user at a given time. When a user selects Me > See all in the "select a person to see what they're working on" pane, Delve shows the most relevant people for a user at a given time.
Data available through an export link in Delve
- People list data: These are the people the user has viewed in Delve. The People list is shown in the left pane on the home page. Users can export the list of people they have most recently viewed in Delve.
- Favorites data: These are boards and documents that the user has marked as their favorite. The Favorites page shows boards and documents that the user has added to their favorites. Users can export a list of their current favorite boards and documents.
- Feature settings data: These are Delve configurations or actions that result from a user's use of Delve. Users can export a full list of these settings.
To access or export the above data, the user can select the gear icon in the upper-right corner in Delve, and then select Feature settings > Export data. Information is exported in JSON format.
Data that's available through other services
- Popular documents data: These are documents and email attachments that may be relevant to the user. Delve dynamically organizes these documents and email messages based on the user's activities and people they work with in Office 365. When a user opens Delve or selects Home, Delve shows the most relevant documents or attachments for the user at a given time. To access or export the actual documents and attachments, the user can go to the Office 365 service through which the document or attachment was made available (such as Office.com, SharePoint, OneDrive for work and school, or Exchange Online).
- Recent documents and email attachments data: These are the most recent documents and email attachments that the user has modified. When a user selects Me > See all in the "Get back to your recent documents and email attachments" pane, Delve shows the latest documents and email attachments the user has modified at a given time. To access or export the actual documents and attachments, the user can go to the Office 365 service through which the document or attachment was made available; for example, Office.com, SharePoint, OneDrive for work and school, or Exchange Online.
- Documents from people around your data: These are the documents that Delve has inferred are most relevant to the user at a given time. When a user selects Me > See all in the "Discover documents from people around you" pane, Delve shows the most relevant documents for a user at a given time. To access or export the actual documents, the user can go to the Office 365 service through which the document or attachment was made available (for example, Office.com, SharePoint, OneDrive for work and school, or Exchange Online).
Rectify
Users can modify the following information in Delve:
- Profile information: A user can select Me > Update profile to update their information. Depending on your organization's settings in the Global Address List, users may not be able to modify all their profile information, such as their name or job title.
- Feature settings: A user can select the gear icon in the upper-right corner in Delve, and then select Feature settings > to change the desired settings.
Restrict
To restrict processing in Delve for your organization, you can turn off the Office Graph. Learn more here.
Delete
Users can delete the following information in Delve:
- Profile information: To delete profile information, a user can select Me > Update profile and either delete free-form text. Depending on your organization's settings in the Global Address List, users may not be able to delete all their profile information, such as their name or job title.
- Documents and email attachments: To delete a document or attachment, users must go to the service where the document or attachment is stored (such as SharePoint, OneDrive for work and school, or Exchange Online) and delete the document there.
Viva Personal Insights
Viva Personal Insights provides statistics to users to help them understand how they spend their time at work. To help your users better understand the data that is presented to them in their personal dashboard and how that data is calculated, direct your users to Viva Personal Insights dashboard.
Access and export
If your organization uses Viva Personal Insights, then Microsoft generates insights for all users. Viva Personal Insights are derived from email and meeting headers in the user's mailbox. Users can go to the Viva Personal Insights dashboard while signed in to their Office 365 account to view the insights that are generated about how they spend their time at work. They can take screenshots of Viva Personal Insights if they want to have permanent copies of their information.
Rectify
All insights generated by Viva Personal Insights are derived from the user's mail and calendar items. Therefore, there's nothing to rectify other than the source email or calendar items.
Restrict
To restrict processing for a specific user, you can opt them out of Viva Personal Insights. To see how, see Configure Viva Personal Insights.
Delete
All mailbox content, including Viva Personal Insights data, is purged when a user account is "hard-deleted" from Active Directory. For more information, see the Deleting a user section in this guide.
Viva Manager/Leader/Advanced Insights
Viva Manager/Leader/Advanced Insights allows organizations to augment Office 365 data with their own business data to gain insights about organizational productivity, collaboration patterns, and employee engagement. This article explains the control that your organization has over the data that Viva Manager/Leader/Advanced Insights processes and who has access to that data.
To assist you with DSRs in Viva Manager/Leader/Advanced Insights:
Determine whether your organization is using Viva Manager/Leader/Advanced Insights. For more information, see Assign licenses to users. If your organization isn't using Viva Manager/Leader/Advanced Insights, there's no further action.
If your organization is using Viva Manager/Leader/Advanced Insights, then see who in your organization has been assigned to the role of Viva Manager/Leader/Advanced Insights administrator. You should also determine if the data subject's mailbox is licensed for Viva Manager/Leader/Advanced Insights. If necessary, have your Viva Manager/Leader/Advanced Insights administrator contact Microsoft Support in handling the following DSR requests:
Access and export
Viva Manager/Leader/Advanced Insights reports created by you may or may not contain personal data of users that your organization licensed for Viva Manager/Leader/Advanced Insights, depending on the information that your organization used to supplement the Office 365 data. Your Viva Manager/Leader/Advanced Insights administrator needs to review those reports to determine if they contain a user's personal data. If a report does contain a user's personal data, then you need to decide if you want to provide a copy of that report to the user. Viva Manager/Leader/Advanced Insights allows you to export the report.
Rectify
As explained above, Viva Manager/Leader/Advanced Insights uses Office 365 data with the organizational data that you provide to generate reports of interest to you. The Office 365 data can't be rectified; it's based on a user's email and calendar activities. However, the organizational data that you've uploaded into Viva Manager/Leader/Advanced Insights to generate the report can be rectified. To do this, you need to correct the source data, upload it, and rerun the report to generate a new Viva Manager/Leader/Advanced Insights report.
Restrict
To restrict processing for a specific user, you can remove their Viva Manager/Leader/Advanced Insights license.
Delete
If a data subject would like to be removed from a Viva Manager/Leader/Advanced Insights report or set of reports, you can delete the report. It is your responsibility to delete users from any organizational data that you used to generate the report, and reupload the data. All data about the user is removed when a user account is "hard-deleted" from Microsoft Entra ID.
To remove the personal data of a data subject, a global administrator can take the following steps:
- Remove the Viva Manager/Leader/Advanced Insights license from the data subject.
- Delete the Microsoft Entra entry for the data subject. (For more information, see Delete a user.)
- Contact support and have support open a ticket for a Data Subject Rights (DSR) user-delete request. In this ticket, identify the data subject by using their User Principal Name (UPN).
- Export a copy of the HR data from the company's HR system (see Export data), remove the data subject's information from that HR data file, and then upload the edited HR data file in .csv format into Viva Manager/Leader/Advanced Insights (see Upload organizational data).
Part 3: Responding to DSRs for system-generated Logs
Microsoft also provides you with the ability to access, export, and delete system-generated logs that may be deemed personal under the GDPR's broad definition of "personal data." Examples of system-generated logs that may be deemed personal under GDPR include:
- Product and service usage data such as user activity logs
- User search requests and query data
- Data generated by product and services as a product of system functionality and interaction by users or other systems
The ability to restrict or rectify data in system-generated logs isn't supported. Data in system-generated logs constitutes factual actions conducted within the Microsoft cloud and diagnostic data, and modifications to such data would compromise the historical record of actions and increase fraud and security risks.
Accessing and exporting system-generated logs
The tenant admin is the only person within your organization who can access system-generated logs associated with a particular user's use of Office 365 services and applications. The data retrieved for an export request will be provided in a machine-readable format and will be provided in files that will allow the user to know which services the data is associated with. As noted above, the data retrieved won't include data that may compromise the security or stability of the service.
To access and export system-generated logs:
Sign in to the Azure portal.
Type "user privacy" in the search box.
Select User Privacy.
Under section Request to export user data. Select Add export request.
Complete the Export data request:
- User Type. Type the email address of the Microsoft Entra user that requested the export and search by name or email the Microsoft Entra user that requested the export.
- Export destination. Select the Microsoft Entra user that requested the export.
Select Create.
The export request goes into Pending status. You can view the report status on the User privacy > Manage User Requests.
Important
Because personal data can come from multiple systems, it's possible that the export process might take up to one month to complete.
Notify about exporting or deleting issues
If you run into issues while exporting or deleting data from the Azure portal, go to the Azure portal Help + Support blade and submit a new ticket under Subscription Management > Privacy and compliance requests for Subscriptions > Privacy Blade and GDPR Requests.
Note
When you export data from the Azure portal, system-generated data for a few applications will not be exported. To export data for these applications, see Additional steps to export system-generated log data.
The following summarizes accessing and exporting system-generated logs:
How long does an export request using the Azure portal take to complete a request?: This can depend on several factors. Usually it should complete in one or two days, but it can take up to 30 days.
What format will the output be in?: The output is structured machine-readable files such as XML, CSV, or JSON.
Who has access to Azure portal to submit access requests for system-generated data?: Office 365 global administrators have access to the Azure portal.
What data do the export results return?: The results contain system-generated logs that Microsoft stores. Exported data spans across various Microsoft services including Office 365, Azure, and Dynamics. The results don't include data that may compromise the security or stability of the service.
How is data returned to the user?: Data is exported to your organization's Azure storage location; it's up to admins in your organization to determine how they'll show/return this data to users.
What will system-generated log data look like?: Below is an example, the data are in JSON format:
[{
"DateTime": "2017-04-28T12:09:29-07:00",
"AppName": "SharePoint",
"Action": "OpenFile",
"IP": "154.192.13.131",
"DevicePlatform": "Windows 1.0.1607"
}]
Product and service usage data for some of Microsoft's most often-used services, such as Exchange Online, SharePoint, Skype for Business, Yammer, and Office 365 Groups can also be retrieved by searching the Office 365 audit log in the Microsoft Purview compliance portal. For more information, see Use the Office 365 audit log search tool in DSR investigations in Appendix A. Using the audit log may be of interest to you because it's possible to assign permissions to other people in your organization (such as your compliance officer) to search the audit log to access this data.
Deleting system-generated logs
To delete system-generated logs retrieved through an access request, you must remove the user from the service and permanently delete their Microsoft Entra account. For instructions about permanently delete a user, see the Deleting a user section in this guide. It's important to note that permanently deleting a user account is irreversible once initiated.
Permanently deleting a user account removes the user's data from system-generated logs, except for data that may compromise the security or stability of the service, for nearly all Office 365 services within 30 days.
One exception to this 30-day period is that the permanent deletion of the user account in Exchange Online takes longer than 30 days. This is due to the critical nature of Exchange Online content and to prevent accidental data loss. Exchange Online has been engineered to intentionally place data in a holding state for up to 60 days after a user account has been permanently deleted. To permanently delete a user's Exchange Online data in a 30-day time frame, permanently delete the user account in Microsoft Entra ID and then contact Microsoft Support and request that the user's Exchange Online data be manually removed outside the scheduled delete process. For more information, see Removing Exchange Online data, which was previously explained in this guide
Deleting a user's account won't remove system-generated logs for Viva Engage. To remove the data from these applications, see one of the following:
- Viva Engage - Manage GDPR data subject requests in Viva Engage
National clouds
A global IT admin needs to do the following to export system-generated log data in the following national clouds:
- Office 365 US Government: Go to the Office 365 admin portal and submit a request to Microsoft Support.
- Office 365 operated by 21Vianet (China): Go to the Office 365 operated by 21Vianet admin portal and then go to Commerce > Subscription > Privacy > GDPR and enter the required information.
Part 4: Additional resources to assist you with DSRs
DSR guides for other Microsoft enterprise services
This guide is dedicated to the article of how to find and act on personal data to respond to DSRs when using Office 365 products, services, and administrative tools. Go to the Microsoft Service Trust Portal to access similar guides for other Microsoft enterprise services.
Microsoft Support
"Support Data" is the data you and your users provide to Microsoft if your organization or your users engage with Microsoft to receive product support related to Office 365 or other Microsoft products and services (for example, to troubleshoot unexpected product behavior). Some of this data may contain personal data. For more information, see Microsoft Support and Professional Services Data Subject Requests for the GDPR.
Product and services authenticated with an Org ID for which Microsoft is a data controller
Parts 1 through 3 of this guide covers products and services for which Microsoft is a data processor to your organization, and thus DSR capability is made available to your tenant administrator. There are various circumstances where your organization's users may use their work or school account (also referred to as "Microsoft Entra ID" or "AAD") to sign in to Microsoft products and services for which Microsoft is a data controller. For all such products and services, your users need to initiate their own data subject requests directly to Microsoft and Microsoft will fulfill the requests directly to the user. By design, products and services involving storage of user-authored content enable users to access, export, rectify, and delete their user-authored content as part of the inherent functionality of the products. Scenarios where this may apply include the following:
- Optional connected online services: Microsoft 365 Apps for enterprise makes certain optional connected online services available to the user. The list of services and related user controls are listed here. You can decide whether you would like to allow your end users to use these services. For more information, see How admins can manage controller services in Microsoft 365 Apps for enterprise. If these optional services process personal data, Microsoft is a data controller for these services.
- User feedback: If your users elect to provide feedback on Microsoft products and services, Microsoft is a data controller for such feedback to the extent it contains personal data. Microsoft fulfills any data subject requests for feedback collected by Microsoft (including feedback managed by Microsoft subprocessors) except in cases where Microsoft has instructed users not to include personal data during the feedback collection process. Exceptions: If Microsoft has instructed users not to include personal data during the feedback collection process, Microsoft relies on that instruction and will assume that no personal data has been provided. Users who have created a separate account with third-party feedback service providers need to fulfill their DSR directly with those providers.
- Windows authenticated via work or school account: If your organization has purchased Windows licenses, and your users authenticate to organization-provided Windows with their work or school account, Microsoft acts as a data controller.
- User-acquired products or services: If you allow your users, acting in their individual capacity, to acquire Microsoft products or services that use Microsoft Entra ID for authentication (for example, Office add-ons or applications available in a Microsoft Store), Microsoft may be a data controller. For any such Microsoft products or services, users need to contact Microsoft directly to initiate a DSR.
Important
If you delete a user as enabled via Microsoft Entra ID, your (former) user will lose the ability to sign in to any products or services for which he or she formerly relied upon for a work or school account. Additionally, Microsoft will no longer be able to authenticate the user in connection with a DSR request for products or services for which Microsoft is a data controller. If you wish to enable a user to initiate DSRs against such services, it is important you instruct your user to do so before you delete the user's Microsoft Entra account.
Personal accounts
If your users have used Microsoft accounts (that is, personal accounts) to acquire products and services from Microsoft for their own use and for which Microsoft is a data controller, they may initiate DSR requests by using the Microsoft privacy dashboard.
Third-party products
If your organization, or your users acting in their individual capacity, have acquired products or services from third parties and use their Microsoft work or school account for authentication, any data subject requests should be directed to the applicable third party.
Appendix A: Preparing for DSR investigations
To help prepare your organization to undertake DSR investigations using Office 365 services, consider the following recommendations:
- Use the DSR eDiscovery case tool in the Microsoft Purview compliance portal to manage DSR investigations
- Set up Compliance Boundaries to limit the scope of Content Searches
- Use the audit log search tool in DSR investigations
Use the DSR case tool to manage DSR investigations
We recommend that you use the DSR case tool in the Microsoft Purview compliance portal to manage DSR investigations. By using the DSR case tool, you can:
Create a separate case for each DSR investigation.
Use the built-in to search for all content related to a specific data subject. When you create a case and start the search, these content locations are searched:
- All mailboxes in your organization (including the mailboxes associated with all Microsoft Teams and Microsoft 365 Groups)
- All SharePoint sites and OneDrive for work and school accounts in your organization
- All Microsoft Teams sites and Microsoft 365 group sites in your organization
- All public folders in Exchange Online
Revise the default search query and rerun the search to narrow the search results.
Control who has access to the case by adding people as members of the case; only members can access the case and are only able to see their cases in the list of cases on the DSR cases page in the Microsoft Purview compliance portal. Additionally, you can assign different permissions to different members of the same case. For example, you could allow some members to only view the case and the results of a Content Search and allow other members to create searches and export search results.
Create export jobs to export the search results in response to a DSR export request. You can export all content returned by the Content Search. Other Office 365 data related to a data subject is also exported.
Create export jobs to export the search results in response to a DSR export request. You can export all content returned by the Content Search. You can also export system-generated logs for Office Roaming service.
Delete cases when the DSR investigation process is complete. This removes all the content searches and export jobs associated with the case.
To get started with using DSR cases, see Manage GDPR data subject requests with the DSR case tool in the Microsoft Purview compliance portal.
Important
An eDiscovery Administrator can view and manage all DSR cases in your organization. For more information about the different roles related to eDiscovery, see Assign eDiscovery permissions to potential case members.
Set up Compliance Boundaries to limit the scope of Content Searches
Compliance Boundaries are implemented by using the search permissions filtering functionality in the Microsoft Purview compliance portal. Compliance Boundaries create logical search boundaries within an organization that control/limit which content locations (for example Exchange Online mailboxes and SharePoint sites) that an IT admin or compliance officer can search. Compliance Boundaries are useful for multi-national organizations that need to respect geographical boundaries, governmental organizations that need to separate different agencies, and business organizations that segregated into business unit or department. For all these scenarios, Compliance Boundaries can be used in DSR investigations to limit which mailboxes and sites can be searched by people involved in the investigation.
You can use Compliance Boundaries together with eDiscovery cases to limit the content locations that can be searched in an investigation to those locations only within the agency or business unit.
Here's a high-level overview of how to implement Compliance Boundaries (together with eDiscovery cases) for DSR investigations.
Determine the agencies in your organization that will be designated as a compliance boundary.
Determine which user object attribute in Microsoft Entra ID will be used to define the compliance boundary. For example, you might choose the Country, CountryCode, or Department attribute, so that members of the admin role group that you create in the next step can only search the content locations of the users that have a specific value for that attribute. This is how you limit who can search for content in a specific agency.
Note
Currently, you must perform an additional step for OneDrive for work and school and file a Microsoft Support request to have the attribute synchronized to OneDrive for work and school accounts.
Create an admin role group in the Microsoft Purview compliance portal for each compliance boundary. We recommend that you create these role groups by copying the built-in eDiscovery Manager role group and then removing any roles as necessary.
Add members to each of the specific role groups as eDiscovery Mangers. Members are the people responsible for investigating and responding to DSRs, and will typically consist of IT admins, data privacy officers, compliance managers, and human resource representatives.
Create a search permissions filter for each compliance boundary so that the members of the corresponding admin role group can only search mailboxes and sites for users within that agency/compliance boundary. The search permissions filter allows members of the corresponding role group to search only the content locations with user object attribute value that corresponds to the agency/compliance boundary.
For step-by-step instructions, see Set up compliance boundaries for eDiscovery investigations in Office 365.
Use the audit log search tool in DSR investigations
IT admins can use the audit log search tool in the Microsoft Purview compliance center to identity documents, files, and other Office 365 resources that users have created, accessed, changed, or deleted. Searching for this kind of activity can be useful in DSR investigations. For example, in SharePoint and OneDrive for work and school, auditing events are logged when users perform these activities:
- Accessed a file
- Modified a file
- Moved a file
- Uploaded or downloaded a file
You can search the audit log for specific activities, types of activities, activities performed by a specific user, and other search criteria. In addition to SharePoint and OneDrive for work and school activities, you can also search for activities in Flow, Power BI, and Microsoft Teams. Auditing records are retained for 90 days. Therefore, you won't be able to search for user activities that occurred more than 90 days ago. For a complete list of audited activities and how to search the audit log, see Search the audit log in the Microsoft Purview compliance center.
Tip
To work around the 90-day limitation discussed above and maintain a running history of your organization's auditing records, you could export all activities on a recurring schedule (for example, every 30 days) to have a continuous record of your organization's auditing records.
Feedback
Coming soon: Throughout 2024 we will be phasing out GitHub Issues as the feedback mechanism for content and replacing it with a new feedback system. For more information see: https://aka.ms/ContentUserFeedback.
Submit and view feedback for