Training
Certification
Microsoft Certified: Azure Developer Associate - Certifications
Build end-to-end solutions in Microsoft Azure to create Azure Functions, implement and manage web apps, develop solutions utilizing Azure storage, and more.
This browser is no longer supported.
Upgrade to Microsoft Edge to take advantage of the latest features, security updates, and technical support.
This tutorial is part three in a series. Learn how to add an HTTPS endpoint in an ASP.NET Core service running in Azure Service Fabric. When you're finished, you have a voting application that has an HTTPS-enabled ASP.NET Core web front end that listens on port 443. If you don't want to manually create the voting application in part one of the tutorial series, you can download the source code to get the completed application.
In this tutorial, you learn how to:
The tutorial series shows you how to:
Note
We recommend that you use the Azure Az PowerShell module to interact with Azure. To get started, see Install Azure PowerShell. To learn how to migrate to the Az PowerShell module, see Migrate Azure PowerShell from AzureRM to Az.
Before you begin this tutorial:
For production applications, use a certificate from a certificate authority (CA). For development and test purposes, you can create and use a self-signed certificate. The Service Fabric SDK includes the CertSetup.ps1 script. The script creates a self-signed certificate and imports it to the Cert:\LocalMachine\My certificate store. Open a Command Prompt window as administrator and run the following command to create a certificate that has the subject "CN=mytestcert":
PS C:\program files\microsoft sdks\service fabric\clustersetup\secure> .\CertSetup.ps1 -Install -CertSubjectName CN=mytestcert
If you already have a certificate Personal Information Exchange (PFX) file, run the following to import the certificate to the Cert:\LocalMachine\My certificate store:
PS C:\mycertificates> Import-PfxCertificate -FilePath .\mysslcertificate.pfx -CertStoreLocation Cert:\LocalMachine\My -Password (ConvertTo-SecureString "!Passw0rd321" -AsPlainText -Force)


   PSParentPath: Microsoft.PowerShell.Security\Certificate::LocalMachine\My

Thumbprint                                Subject
----------                                -------
3B138D84C077C292579BA35E4410634E164075CD  CN=zwin7fh14scd.westus.cloudapp.azure.com
Open Visual Studio by using the Run as administrator option, and then open the Voting solution. In Solution Explorer, open VotingWeb/PackageRoot/ServiceManifest.xml. The service manifest defines the service endpoints. Find the Endpoints section and edit the value for ServiceEndpoint endpoint. Change the name to EndpointHttps, set the protocol to https, the type to Input, and the port to 443. Save your changes.
<?xml version="1.0" encoding="utf-8"?>
<ServiceManifest Name="VotingWebPkg"
                 Version="1.0.0"
                 xmlns="http://schemas.microsoft.com/2011/01/fabric"
                 xmlns:xsd="https://www.w3.org/2001/XMLSchema"
                 xmlns:xsi="https://www.w3.org/2001/XMLSchema-instance">
  <ServiceTypes>
    <StatelessServiceType ServiceTypeName="VotingWebType" />
  </ServiceTypes>

  <CodePackage Name="Code" Version="1.0.0">
    <EntryPoint>
      <ExeHost>
        <Program>VotingWeb.exe</Program>
        <WorkingFolder>CodePackage</WorkingFolder>
      </ExeHost>
    </EntryPoint>
  </CodePackage>

  <ConfigPackage Name="Config" Version="1.0.0" />

  <Resources>
    <Endpoints>
      <Endpoint Protocol="https" Name="EndpointHttps" Type="Input" Port="443" />
    </Endpoints>
  </Resources>
</ServiceManifest>
In Solution Explorer, open the VotingWeb/VotingWeb.cs file. Configure Kestrel to use HTTPS and to look up the certificate in the Cert:\LocalMachine\My store. Add the following using statements:
using System.Net;
using Microsoft.Extensions.Configuration;
using System.Security.Cryptography.X509Certificates;
Update the value for ServiceInstanceListener to use the new EndpointHttps endpoint and to listen on port 443. When you set up the web host to use the Kestrel server, you must configure Kestrel to listen for IPv6 addresses on all network interfaces: opt.Listen(IPAddress.IPv6Any, port, listenOptions => {...}.
new ServiceInstanceListener(
serviceContext =>
    new KestrelCommunicationListener(
        serviceContext,
        "EndpointHttps",
        (url, listener) =>
        {
            ServiceEventSource.Current.ServiceMessage(serviceContext, $"Starting Kestrel on {url}");

            return new WebHostBuilder()
                .UseKestrel(opt =>
                {
                    int port = serviceContext.CodePackageActivationContext.GetEndpoint("EndpointHttps").Port;
                    opt.Listen(IPAddress.IPv6Any, port, listenOptions =>
                    {
                        listenOptions.UseHttps(FindMatchingCertificateBySubject());
                        listenOptions.NoDelay = true;
                    });
                })
                .ConfigureAppConfiguration((builderContext, config) =>
                {
                    config.AddJsonFile("appsettings.json", optional: false, reloadOnChange: true);
                })

                .ConfigureServices(
                    services => services
                        .AddSingleton<HttpClient>(new HttpClient())
                        .AddSingleton<FabricClient>(new FabricClient())
                        .AddSingleton<StatelessServiceContext>(serviceContext))
                .UseContentRoot(Directory.GetCurrentDirectory())
                .UseStartup<Startup>()
                .UseServiceFabricIntegration(listener, ServiceFabricIntegrationOptions.None)
                .UseUrls(url)
                .Build();
        }))
Next, add the following method so that Kestrel can find the certificate in the Cert:\LocalMachine\My store by using the subject.
Replace <your_CN_value> with mytestcert if you created a self-signed certificate by using the previous PowerShell command, or use the CN of your certificate.
If you use a local deployment to localhost, we recommend that you use CN=localhost to avoid authentication exceptions.
private X509Certificate2 FindMatchingCertificateBySubject(string subjectCommonName)
{
    using (var store = new X509Store(StoreName.My, StoreLocation.LocalMachine))
    {
        store.Open(OpenFlags.OpenExistingOnly | OpenFlags.ReadOnly);
        var certCollection = store.Certificates;
        var matchingCerts = new X509Certificate2Collection();

    foreach (var enumeratedCert in certCollection)
    {
      if (StringComparer.OrdinalIgnoreCase.Equals(subjectCommonName, enumeratedCert.GetNameInfo(X509NameType.SimpleName, forIssuer: false))
        && DateTime.Now < enumeratedCert.NotAfter
        && DateTime.Now >= enumeratedCert.NotBefore)
        {
          matchingCerts.Add(enumeratedCert);
        }
    }

        if (matchingCerts.Count == 0)
    {
        throw new Exception($"Could not find a match for a certificate with subject 'CN={subjectCommonName}'.");
    }

        return matchingCerts[0];
    }
}
In an earlier step, you imported the certificate to the Cert:\LocalMachine\My store on the development computer.
Now, explicitly give the account that's running the service (Network Service, by default) access to the certificate's private key. You can do this step manually (by using the certlm.msc tool), but it's better to run a PowerShell script by configuring a startup script in the SetupEntryPoint of the service manifest.
Note
Service Fabric supports declaring endpoint certificates by thumbprint or by subject common name. In that case, the runtime sets up the binding and allocation for the certificate's private key to the identity that the service is running as. The runtime also monitors the certificate for changes, renewals, and allocation updates for the corresponding private key.
In Solution Explorer, open VotingWeb/PackageRoot/ServiceManifest.xml. In the CodePackage section, add the SetupEntryPoint node, and then add an ExeHost node. In ExeHost, set Program to Setup.bat, and set WorkingFolder to CodePackage. When the VotingWeb service starts, the Setup.bat script executes in the CodePackage folder before VotingWeb.exe starts.
<?xml version="1.0" encoding="utf-8"?>
<ServiceManifest Name="VotingWebPkg"
                 Version="1.0.0"
                 xmlns="http://schemas.microsoft.com/2011/01/fabric"
                 xmlns:xsd="https://www.w3.org/2001/XMLSchema"
                 xmlns:xsi="https://www.w3.org/2001/XMLSchema-instance">
  <ServiceTypes>
    <StatelessServiceType ServiceTypeName="VotingWebType" />
  </ServiceTypes>

  <CodePackage Name="Code" Version="1.0.0">
    <SetupEntryPoint>
      <ExeHost>
        <Program>Setup.bat</Program>
        <WorkingFolder>CodePackage</WorkingFolder>
      </ExeHost>
    </SetupEntryPoint>

    <EntryPoint>
      <ExeHost>
        <Program>VotingWeb.exe</Program>
        <WorkingFolder>CodePackage</WorkingFolder>
      </ExeHost>
    </EntryPoint>
  </CodePackage>

  <ConfigPackage Name="Config" Version="1.0.0" />

  <Resources>
    <Endpoints>
      <Endpoint Protocol="https" Name="EndpointHttps" Type="Input" Port="443" />
    </Endpoints>
  </Resources>
</ServiceManifest>
To run PowerShell from value for SetupEntryPoint, you can run PowerShell.exe in a batch file that points to a PowerShell file.
First, add the batch file the service project. In Solution Explorer, right-click VotingWeb, and then select Add > New Item. Add a new file named Setup.bat. Edit the Setup.bat file and add the following command:
powershell.exe -ExecutionPolicy Bypass -Command ".\SetCertAccess.ps1"
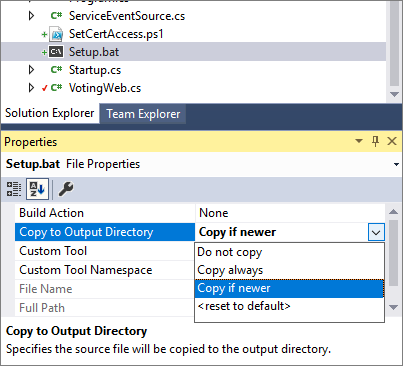
Modify the properties for the Setup.bat file to set Copy to Output Directory to Copy if newer.
In Solution Explorer, right-click VotingWeb. Then, select Add > New Item, and add a new file named SetCertAccess.ps1. Edit the SetCertAccess.ps1 file to add the following script:
$subject="mytestcert"
$userGroup="Network Service"

Write-Host "Checking permissions to certificate $subject.." -ForegroundColor DarkCyan

$cert = (gci Cert:\LocalMachine\My\ | where { $_.Subject.Contains($subject) })[-1]

if ($cert -eq $null)
{
    $message="Certificate with subject:"+$subject+" does not exist at Cert:\LocalMachine\My\"
    Write-Host $message -ForegroundColor Red
    exit 1;
}elseif($cert.HasPrivateKey -eq $false){
    $message="Certificate with subject:"+$subject+" does not have a private key"
    Write-Host $message -ForegroundColor Red
    exit 1;
}else
{
    $keyName=$cert.PrivateKey.CspKeyContainerInfo.UniqueKeyContainerName

    $keyPath = "C:\ProgramData\Microsoft\Crypto\RSA\MachineKeys\"

    if ($keyName -eq $null){
      $privateKey = [System.Security.Cryptography.X509Certificates.RSACertificateExtensions]::GetRSAPrivateKey($cert)
      $keyName = $privateKey.Key.UniqueName
      $keyPath = "C:\ProgramData\Microsoft\Crypto\Keys"
    }

    $fullPath=$keyPath+$keyName
    $acl=(Get-Item $fullPath).GetAccessControl('Access')


    $hasPermissionsAlready = ($acl.Access | where {$_.IdentityReference.Value.Contains($userGroup.ToUpperInvariant()) -and $_.FileSystemRights -eq [System.Security.AccessControl.FileSystemRights]::FullControl}).Count -eq 1

    if ($hasPermissionsAlready){
        Write-Host "Account $userGroup already has permissions to certificate '$subject'." -ForegroundColor Green
        return $false;
    } else {
        Write-Host "Need add permissions to '$subject' certificate..." -ForegroundColor DarkYellow

        $permission=$userGroup,"Full","Allow"
        $accessRule=new-object System.Security.AccessControl.FileSystemAccessRule $permission
        $acl.AddAccessRule($accessRule)
        Set-Acl $fullPath $acl

        Write-Output "Permissions were added"

        return $true;
    }
}
Modify properties for the SetCertAccess.ps1 file to set Copy to Output Directory to Copy if newer.
By default, the service setup entry point executable runs by using the same credentials as Service Fabric (typically, the Network Service account). The SetCertAccess.ps1 requires administrator permissions. In the application manifest, you can change the security permissions to run the startup script under a local administrator account.
In Solution Explorer, open Voting/ApplicationPackageRoot/ApplicationManifest.xml. First, create a Principals section and add a new user (for example, SetupAdminUser). Add the SetupAdminUser user account to the Administrators system group.
Next, in VotingWebPkg, in the ServiceManifestImport section, configure a RunAsPolicy to apply the SetupAdminUser principal to the setup entry point. This policy tells Service Fabric that the Setup.bat file runs as SetupAdminUser (with administrator permissions).
<?xml version="1.0" encoding="utf-8"?>
<ApplicationManifest xmlns:xsd="https://www.w3.org/2001/XMLSchema" xmlns:xsi="https://www.w3.org/2001/XMLSchema-instance" ApplicationTypeName="VotingType" ApplicationTypeVersion="1.0.0" xmlns="http://schemas.microsoft.com/2011/01/fabric">
  <Parameters>
    <Parameter Name="VotingData_MinReplicaSetSize" DefaultValue="3" />
    <Parameter Name="VotingData_PartitionCount" DefaultValue="1" />
    <Parameter Name="VotingData_TargetReplicaSetSize" DefaultValue="3" />
    <Parameter Name="VotingWeb_InstanceCount" DefaultValue="-1" />
  </Parameters>
  <ServiceManifestImport>
    <ServiceManifestRef ServiceManifestName="VotingDataPkg" ServiceManifestVersion="1.0.0" />
    <ConfigOverrides />
  </ServiceManifestImport>
  <ServiceManifestImport>
    <ServiceManifestRef ServiceManifestName="VotingWebPkg" ServiceManifestVersion="1.0.0" />
    <ConfigOverrides />
    <Policies>
      <RunAsPolicy CodePackageRef="Code" UserRef="SetupAdminUser" EntryPointType="Setup" />
    </Policies>
  </ServiceManifestImport>
  <DefaultServices>
    <Service Name="VotingData">
      <StatefulService ServiceTypeName="VotingDataType" TargetReplicaSetSize="[VotingData_TargetReplicaSetSize]" MinReplicaSetSize="[VotingData_MinReplicaSetSize]">
        <UniformInt64Partition PartitionCount="[VotingData_PartitionCount]" LowKey="0" HighKey="25" />
      </StatefulService>
    </Service>
    <Service Name="VotingWeb" ServicePackageActivationMode="ExclusiveProcess">
      <StatelessService ServiceTypeName="VotingWebType" InstanceCount="[VotingWeb_InstanceCount]">
        <SingletonPartition />
      </StatelessService>
    </Service>
  </DefaultServices>
  <Principals>
    <Users>
      <User Name="SetupAdminUser">
        <MemberOf>
          <SystemGroup Name="Administrators" />
        </MemberOf>
      </User>
    </Users>
  </Principals>
</ApplicationManifest>
In Solution Explorer, select the Voting application and set the Application URL property to https://localhost:443.
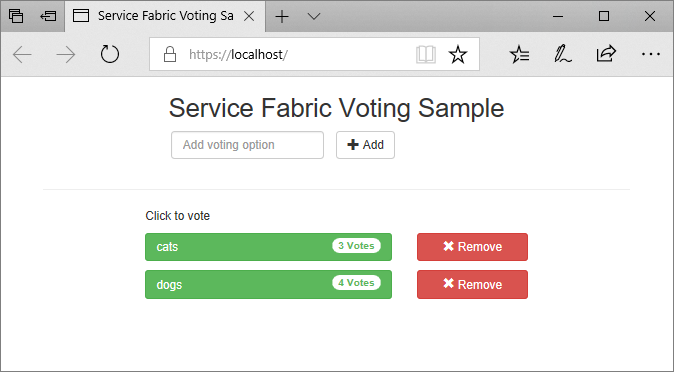
Save all files, and then select F5 to run the application locally. After the application deploys, a browser opens to https://localhost:443. If you're using a self-signed certificate, you see a warning that your PC doesn't trust this website's security. Continue to the webpage.
Before you deploy the application to Azure, install the certificate in the Cert:\LocalMachine\My store of all the remote cluster nodes. Services can move to different nodes of the cluster. When the front-end web service starts on a cluster node, the startup script looks up the certificate and configures access permissions.
To install the certificate on cluster nodes, first export the certificate as a PFX file. Open the certlm.msc application file and go to Personal > Certificates. Right-click the mytestcert certificate, and then select All Tasks > Export.
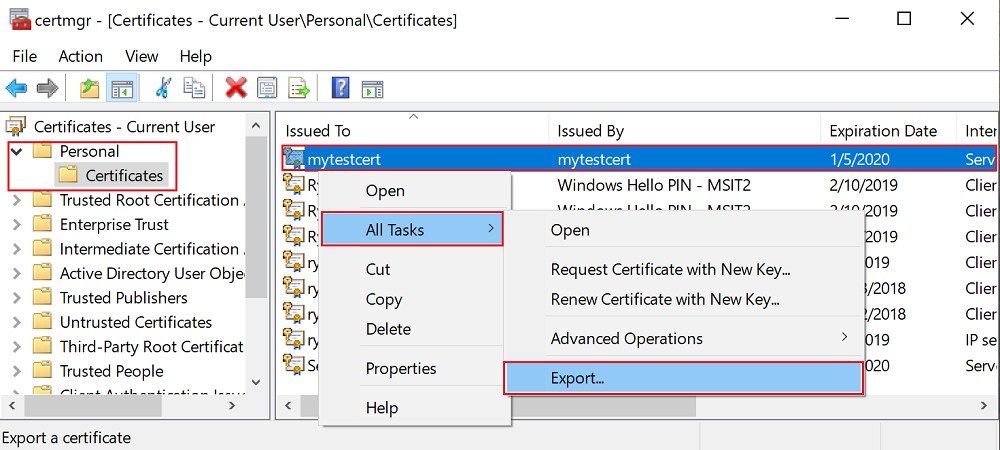
In the export wizard, select Yes, export the private key, and then select the PFX format. Export the file to C:\Users\sfuser\votingappcert.pfx.
Next, install the certificate on the remote cluster by using PowerShell scripts.
Warning
A self-signed certificate is sufficient for development and testing applications. For production applications, use a certificate from a certificate authority (CA) instead of using a self-signed certificate.
Open port 443 in the load balancer if it isn't open:
$probename = "AppPortProbe6"
$rulename="AppPortLBRule6"
$RGname="voting_RG"
$port=443

# Get the load balancer resource
$resource = Get-AzResource | Where {$_.ResourceGroupName –eq $RGname -and $_.ResourceType -eq "Microsoft.Network/loadBalancers"}
$slb = Get-AzLoadBalancer -Name $resource.Name -ResourceGroupName $RGname

# Add a new probe configuration to the load balancer
$slb | Add-AzLoadBalancerProbeConfig -Name $probename -Protocol Tcp -Port $port -IntervalInSeconds 15 -ProbeCount 2

# Add rule configuration to the load balancer
$probe = Get-AzLoadBalancerProbeConfig -Name $probename -LoadBalancer $slb
$slb | Add-AzLoadBalancerRuleConfig -Name $rulename -BackendAddressPool $slb.BackendAddressPools[0] -FrontendIpConfiguration $slb.FrontendIpConfigurations[0] -Probe $probe -Protocol Tcp -FrontendPort $port -BackendPort $port

# Set the goal state for the load balancer
$slb | Set-AzLoadBalancer
Do the same for the associated virtual network:
$rulename="allowAppPort$port"
$nsgname="voting-vnet-security"
$RGname="voting_RG"
$port=443

# Get the network security group resource
$nsg = Get-AzNetworkSecurityGroup -Name $nsgname -ResourceGroupName $RGname

# Add the inbound security rule.
$nsg | Add-AzNetworkSecurityRuleConfig -Name $rulename -Description "Allow app port" -Access Allow `
    -Protocol * -Direction Inbound -Priority 3891 -SourceAddressPrefix "*" -SourcePortRange * `
    -DestinationAddressPrefix * -DestinationPortRange $port

# Update the network security group
$nsg | Set-AzNetworkSecurityGroup
Save all files, switch from Debug to Release, and select F6 to rebuild. In Solution Explorer, right-click Voting and select Publish. Select the connection endpoint of the cluster created in Deploy an application to a cluster, or select another cluster. Select Publish to publish the application to the remote cluster.
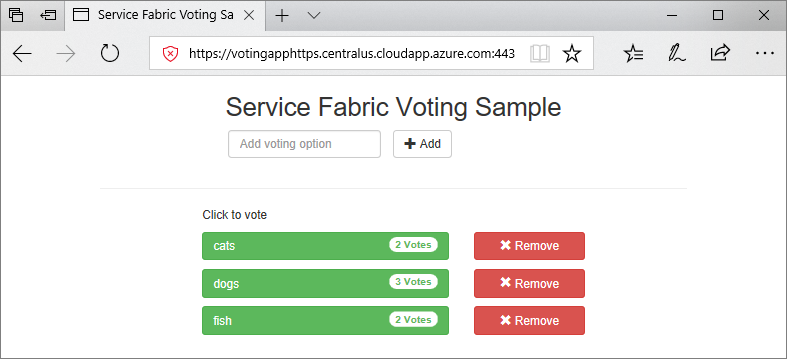
When the application deploys, open a web browser and go to https://mycluster.region.cloudapp.azure.com:443 (update the URL with the connection endpoint for your cluster). If you're using a self-signed certificate, you see a warning that your PC doesn't trust this website's security. Continue to the webpage.
Advance to the next tutorial:
Training
Certification
Microsoft Certified: Azure Developer Associate - Certifications
Build end-to-end solutions in Microsoft Azure to create Azure Functions, implement and manage web apps, develop solutions utilizing Azure storage, and more.